Are you confused with terminologies like Access Token, Access Control, and Personal Access Token while creating connectors? In this article, we will discuss a few such terminologies on the Harness platform, what they mean and what values should be entered against them.
So, in Harness when you are using CI/CD to build or deploy we need access to your source code repository and the enterprise cloud for deployments, and hence encrypted secrets are asked as input. In this blog, I have focused on the common errors faced by beginners while trying to setup GitHub connectors.
To begin with:
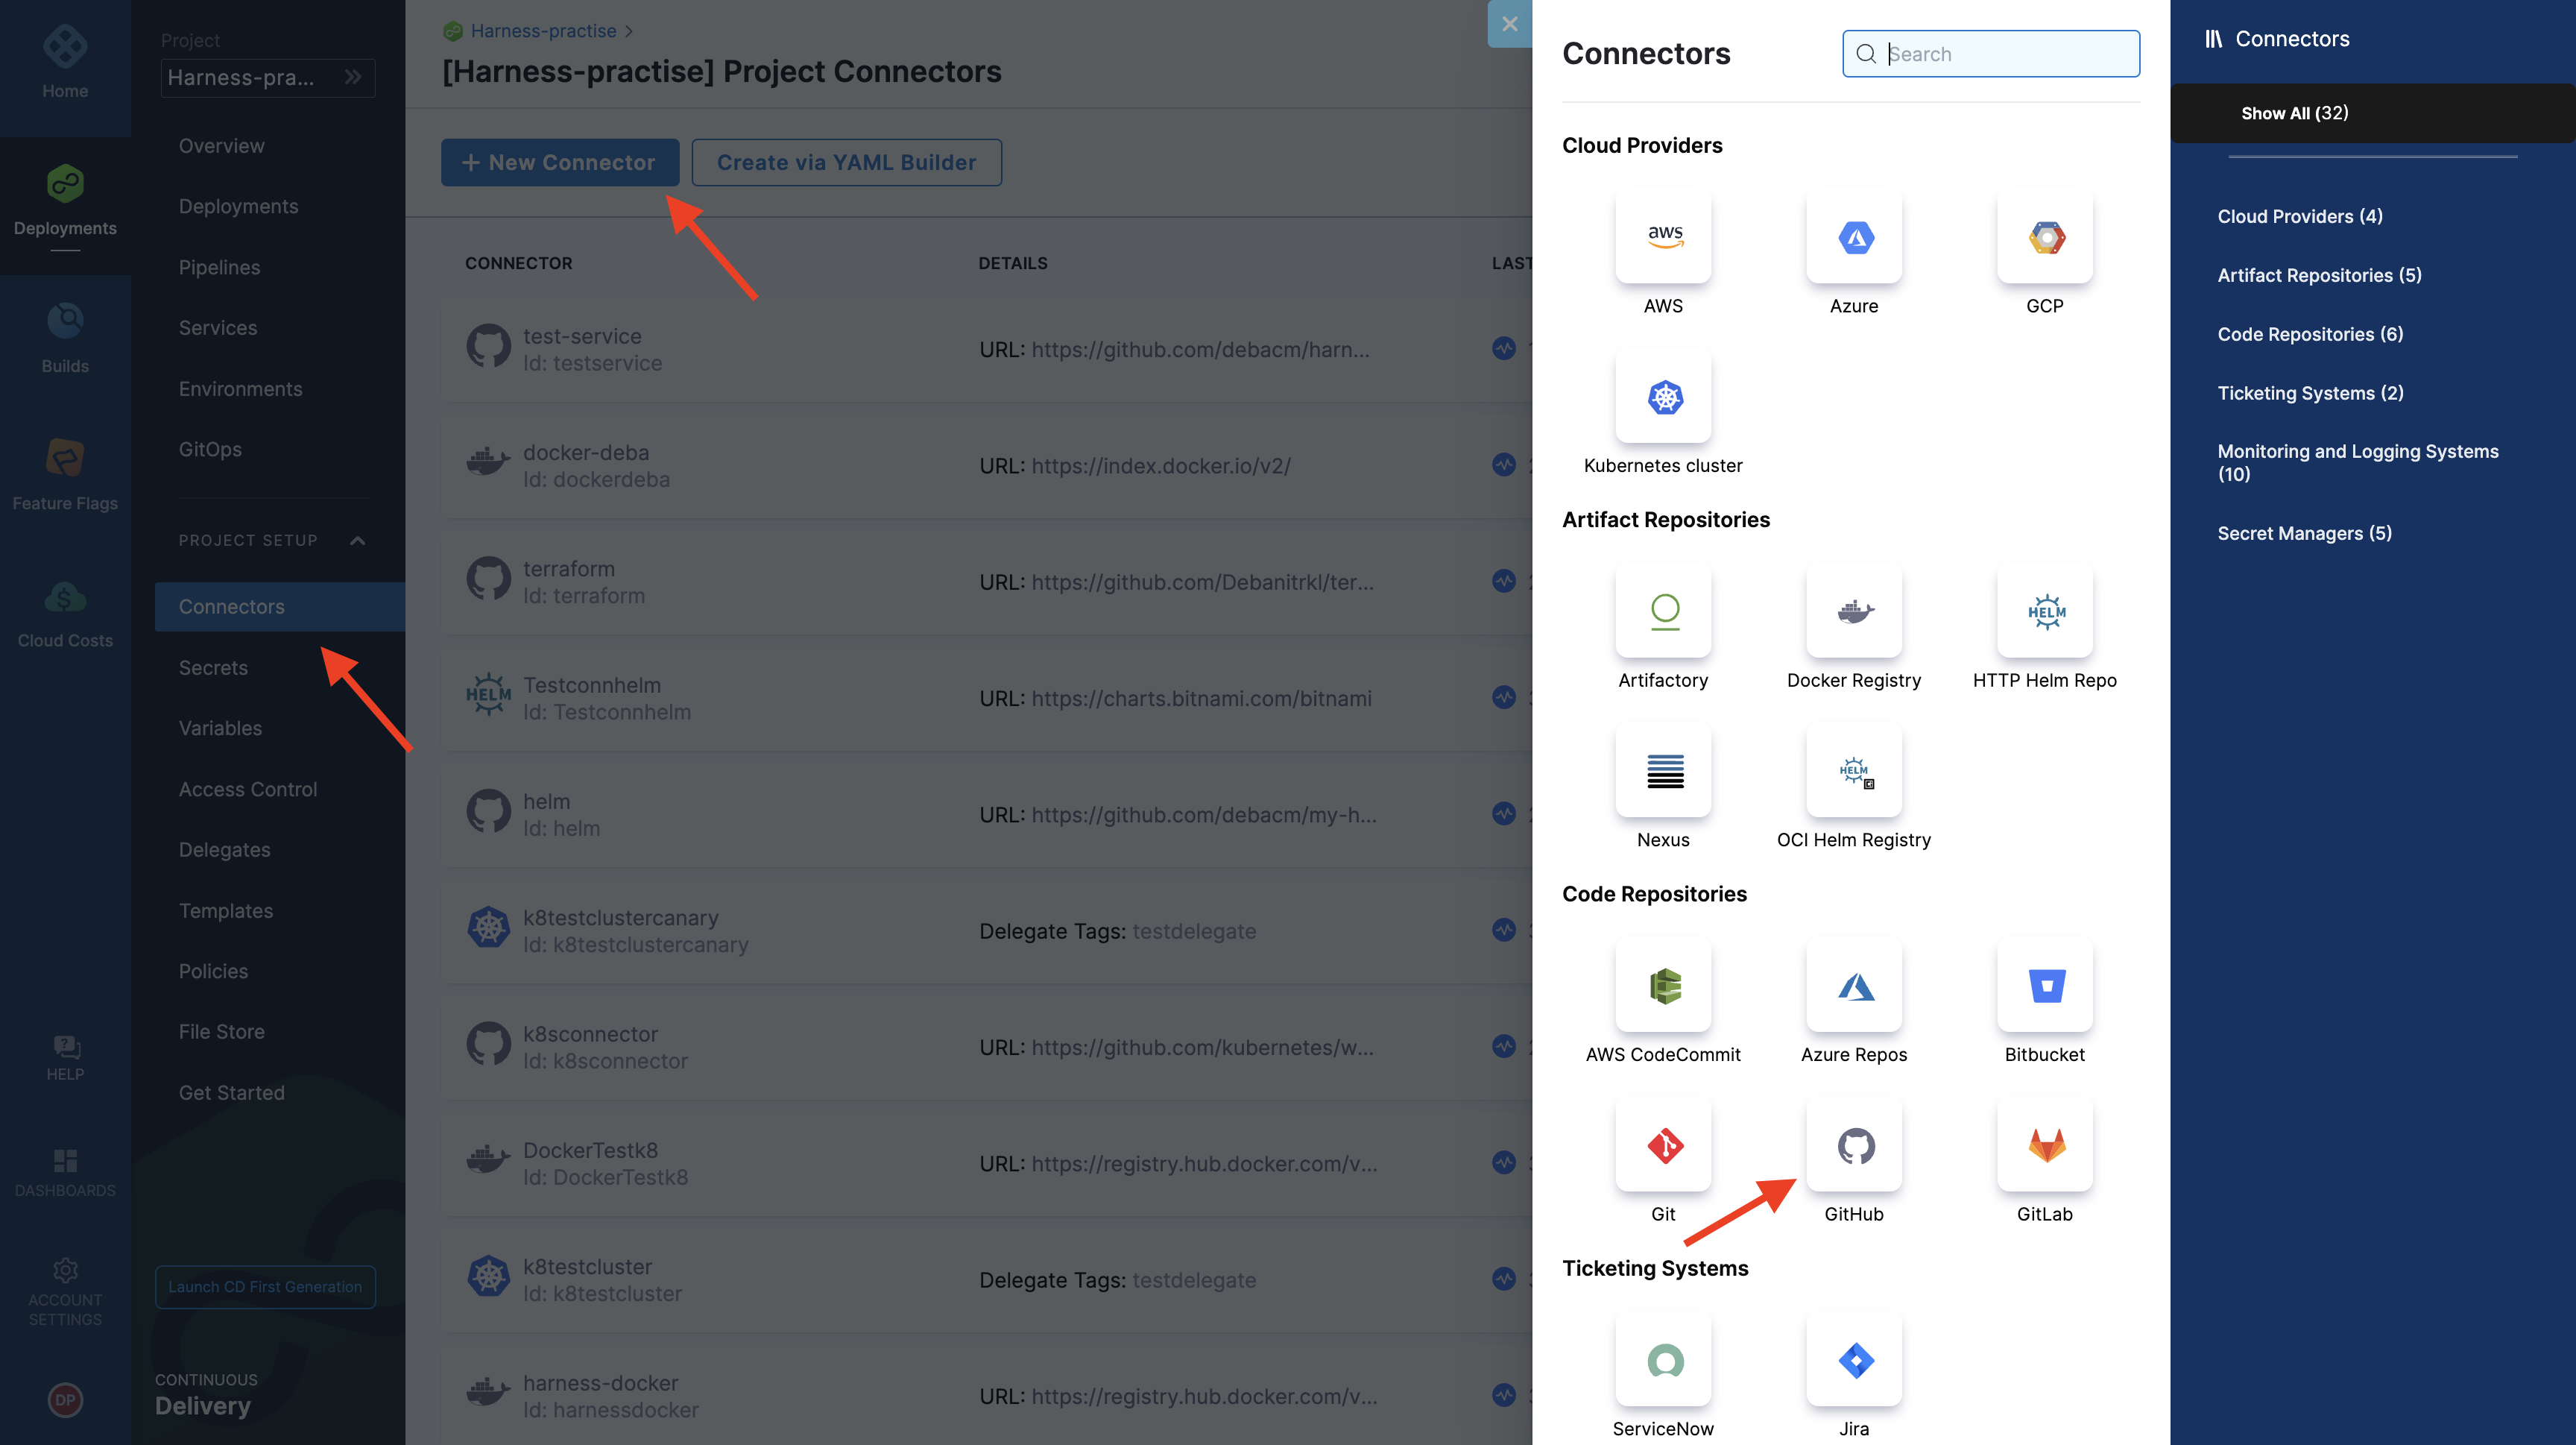
Select new connector and from the new connector tab select Github under Code Repositories
Now it’s time to give a name to your connector, but there’s some entity name convention which you need to follow while naming it.
Some common errors observed here are :
For ease of understanding across orgs and easy identification, you can also add tags and give an apt description to your connector.

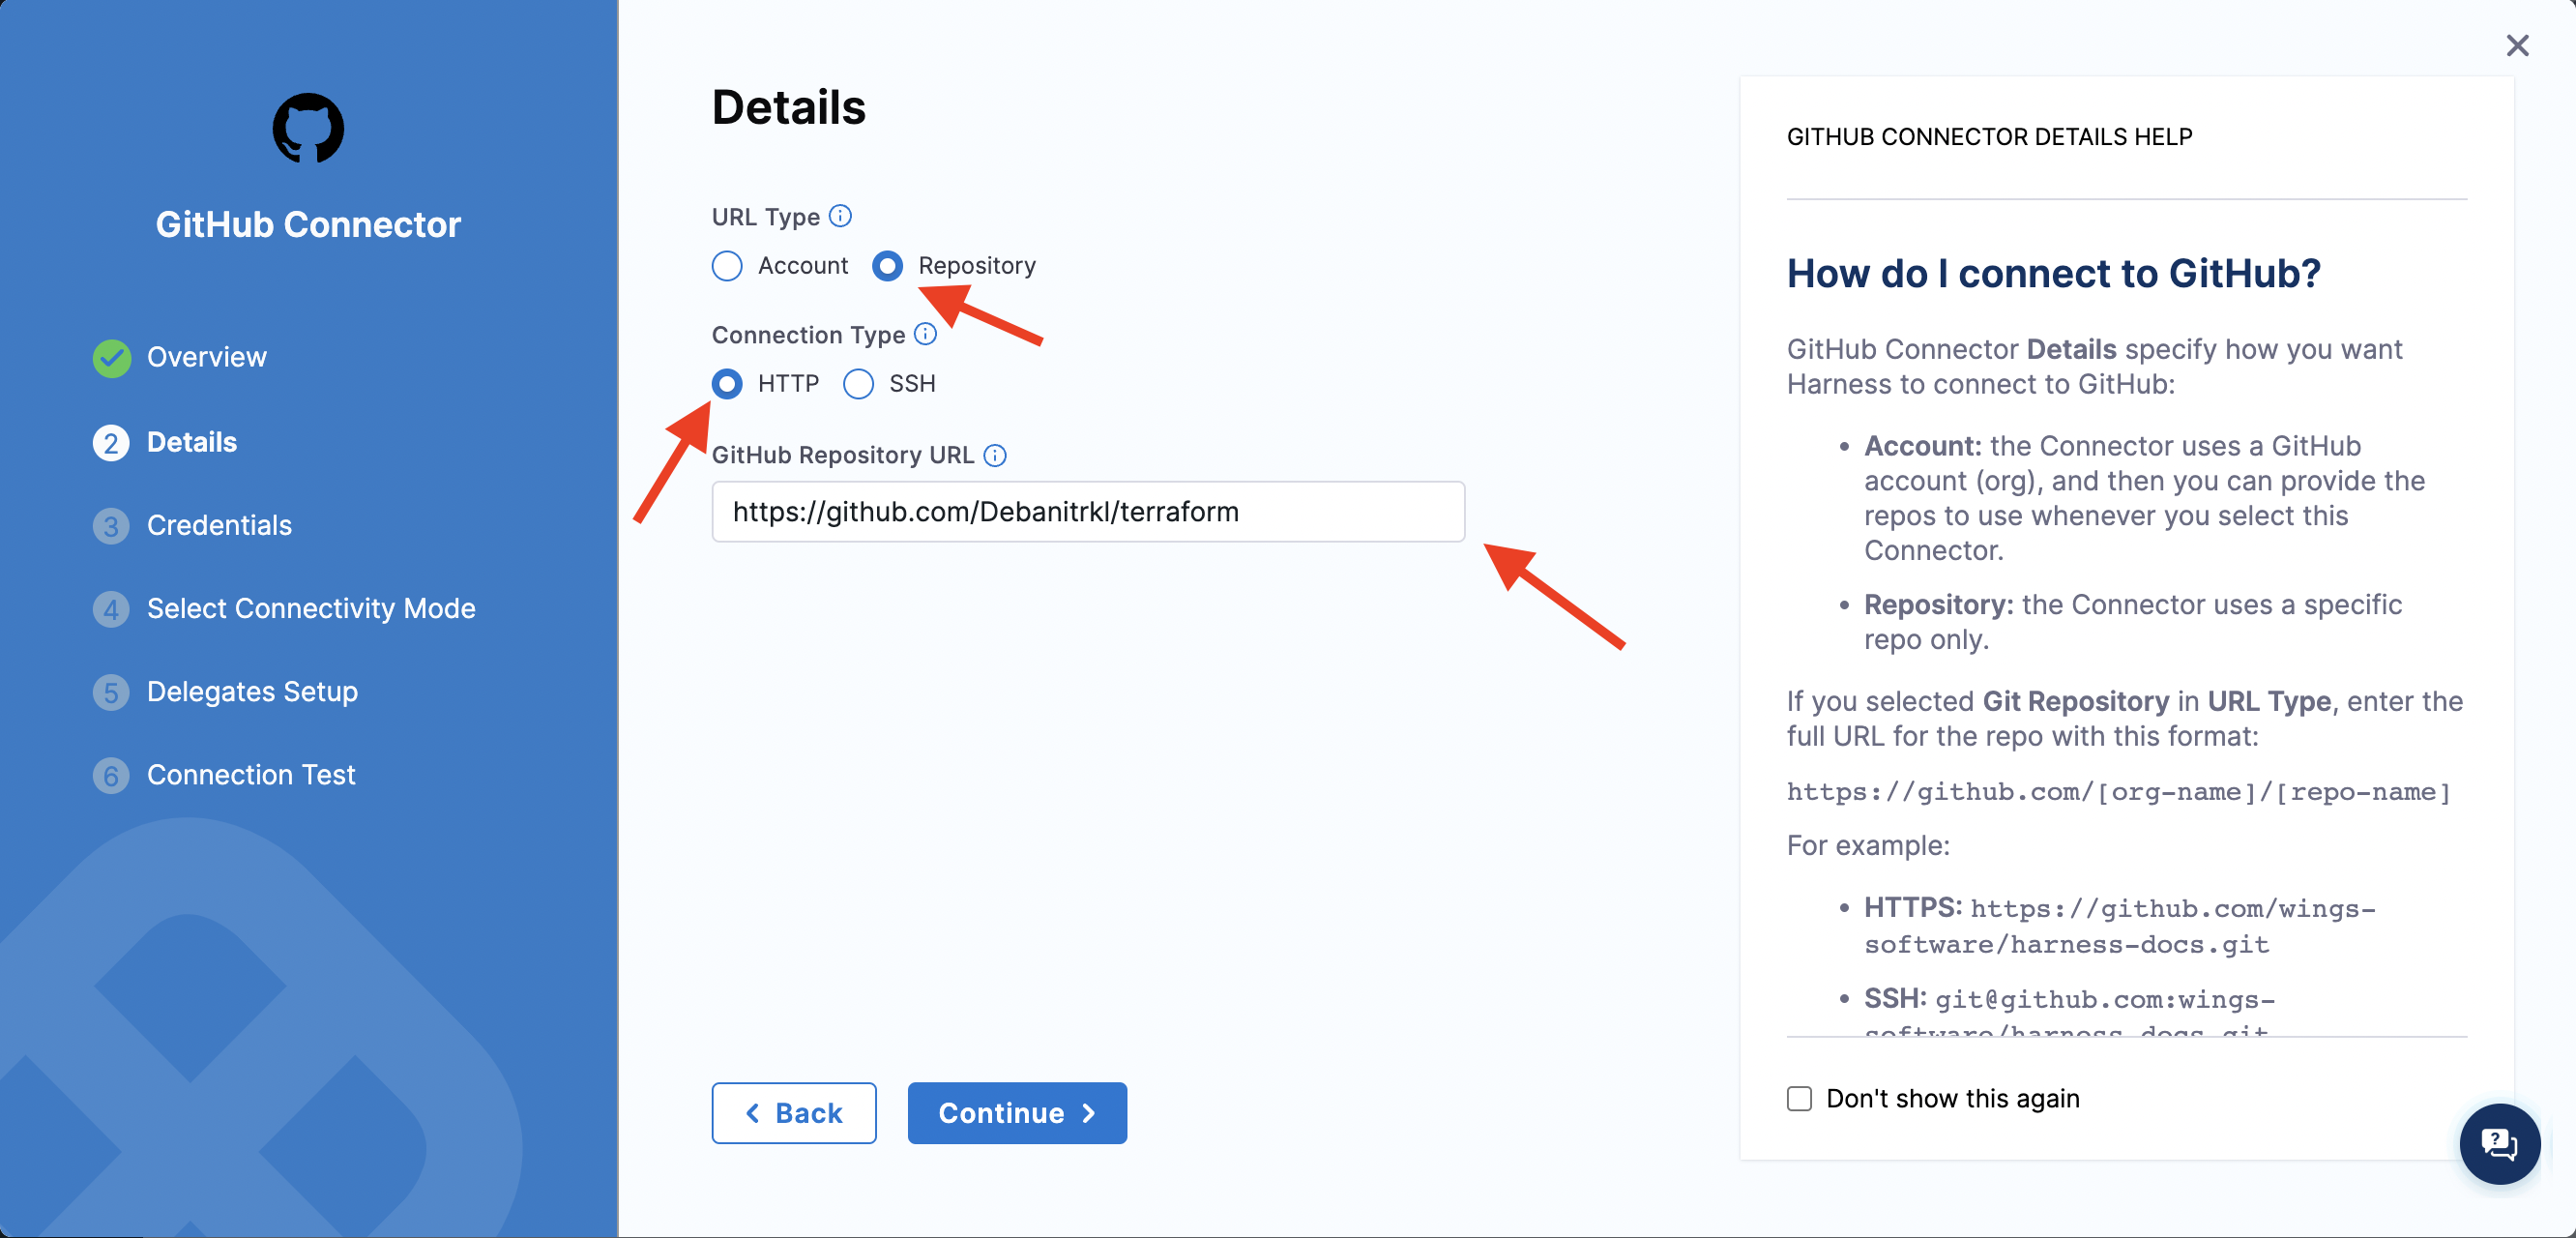
It’s time for one of the most confusing steps of the process, giving the exact address for your connector which comes in two levels
Account
Repository
What’s most intriguing and that first time user’s like me, made a mistake in selecting the connection type, so the suggested method is HTTP for first timers for ease of use and you can fetch this URL for your repository directly from the search bar of your browser or from local clone information available in the repository, which has the following format https://github.com/<account-name> for account URL’s type and https://github.com/<account-name>/<repository-name> for Repository URLs.
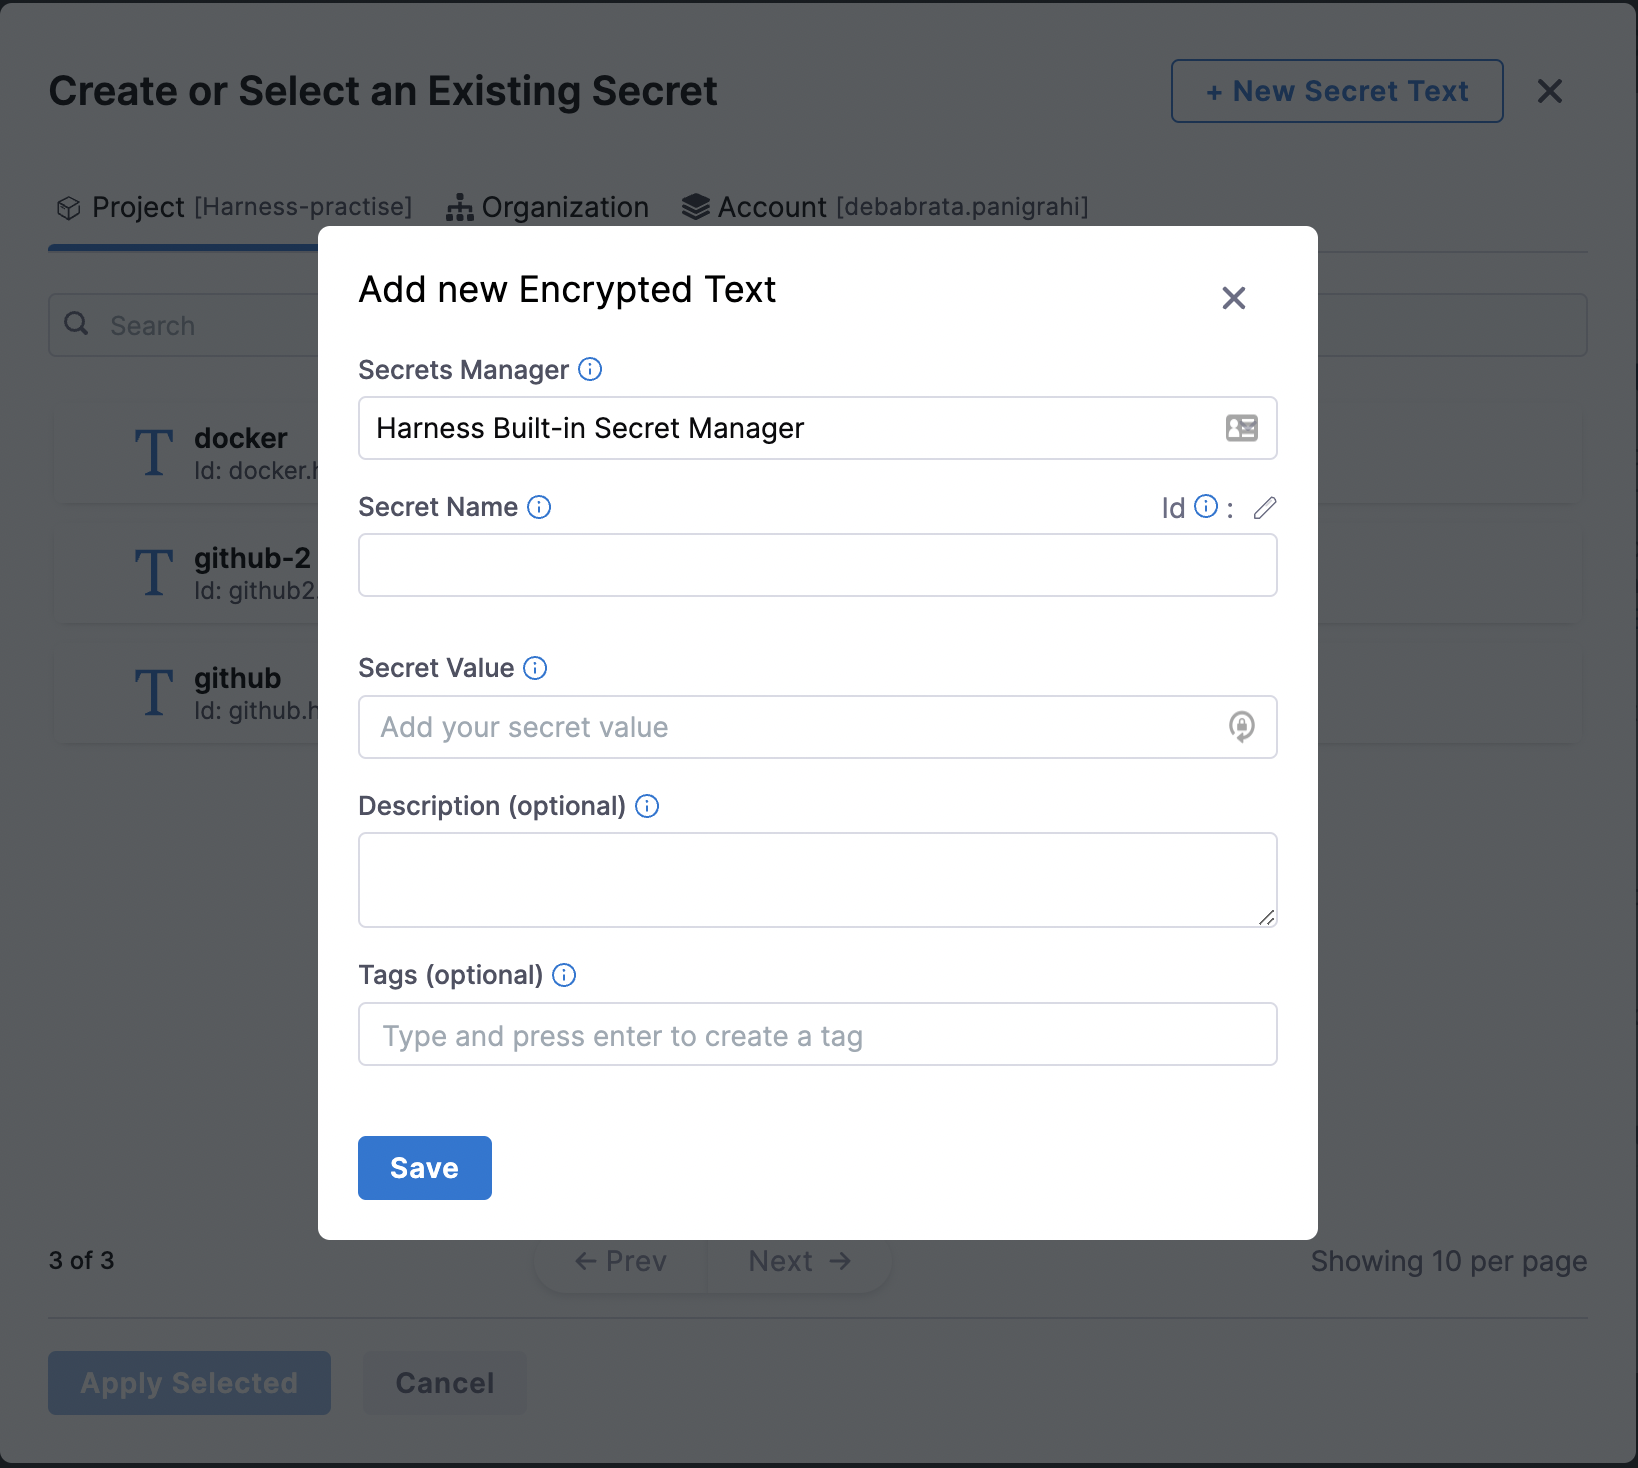
Now, it’s time to add credentials, which are required for the authentication to GitHub repository.
The value in the username field is the same as your GitHub username, and now the most crucial step of adding credentials, is adding the Personal Access Token as a secret, for that, you need to generate the PAT for your account by allowing adequate repo source control permission, which could be done by following the steps here. Further if you already have a PAT as a secret you could just skip to selecting the same, or else you need to add the generated PAT by selecting the “+New Secrets” and mentioning the PAT under the “Secret Value” field.
Be careful not to add your GitHub password under the secrets for GitHub, as some users tend to do this and the connector fails to connect.
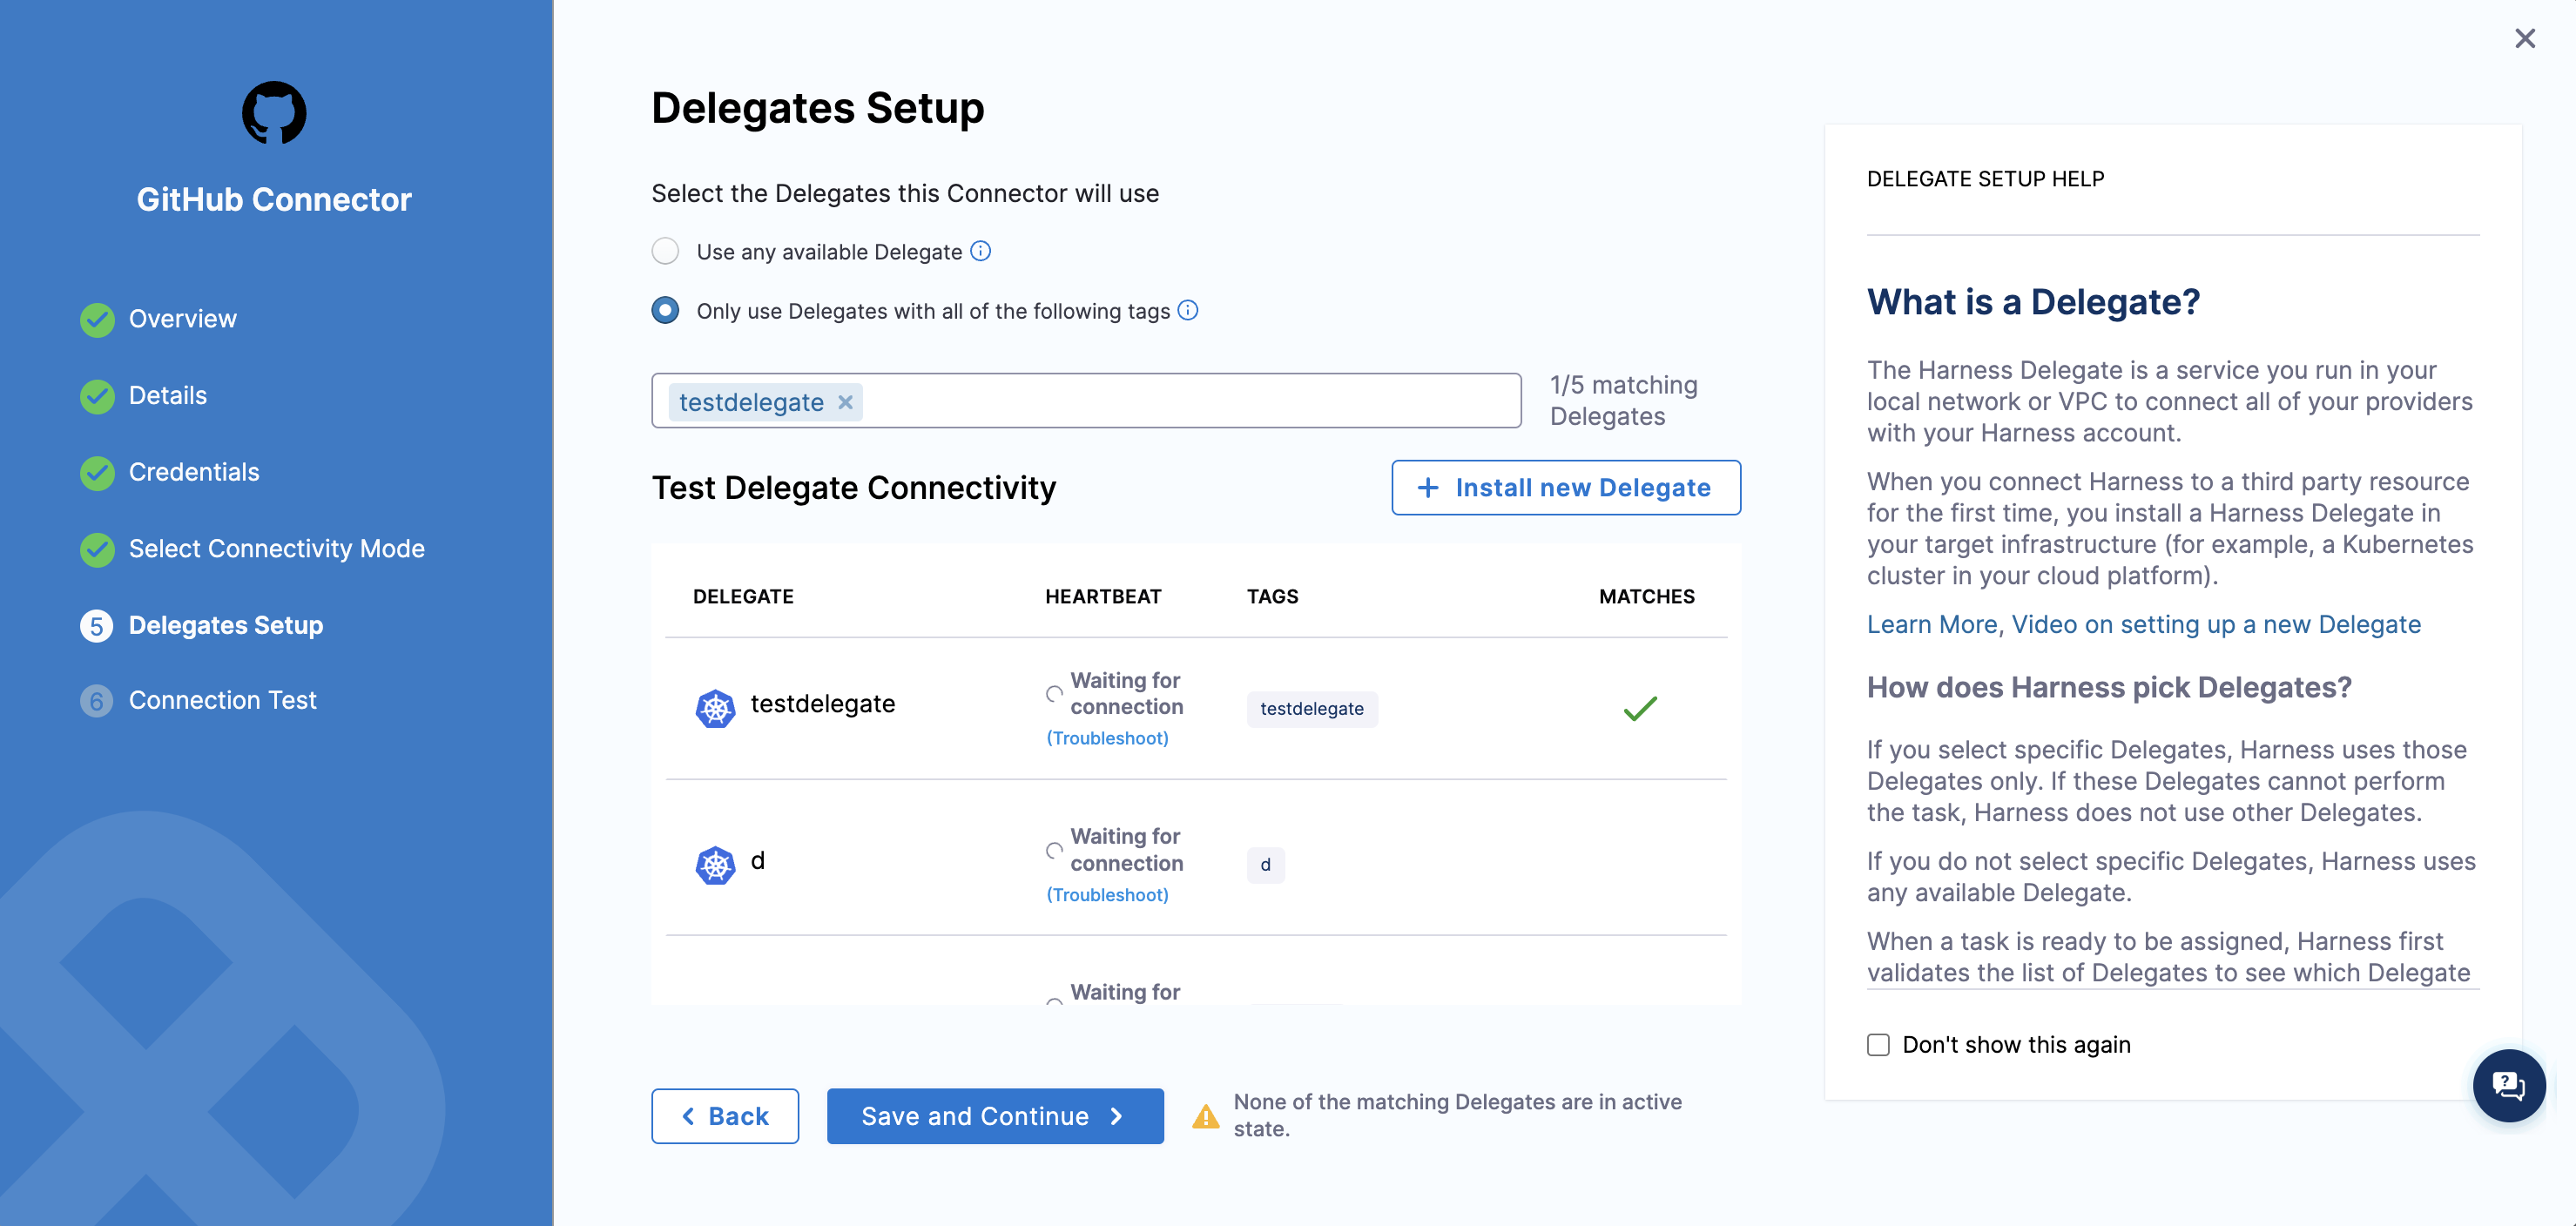
Now while connecting to the provider it’s suggested to go for the connect through delegate step as it would allow delegates to perform tasks for you based on your requirements.
Going further to the Delegate Setup step, I would suggest using any available delegate as a beginner, or if you want to use a particular delegate, select the same and click on the empty field under the same to select and add the delegates.
What’s important to consider here is if you’re an absolute beginner using Harness for the first time, or have never created a delegate, please consider creating a delegate first by selecting the “Install new delegate” and following the resources mentioned here, to move forward and add a connector.
Need further help?
Feel free to ask questions at community.harness.io or join community slack to chat with our engineers in product-specific channels like:
Let us understand what do we mean by delegates and why is it needed
A Harness delegate is a software that you install in your deployment target environment such as local network ,VPC,or cluster and run as a service.The delegate performs all operations including deployment and integration.
The delegate connects all your artifacts,infrastructure,collaboration,verification and other providers with the Harness Manager.
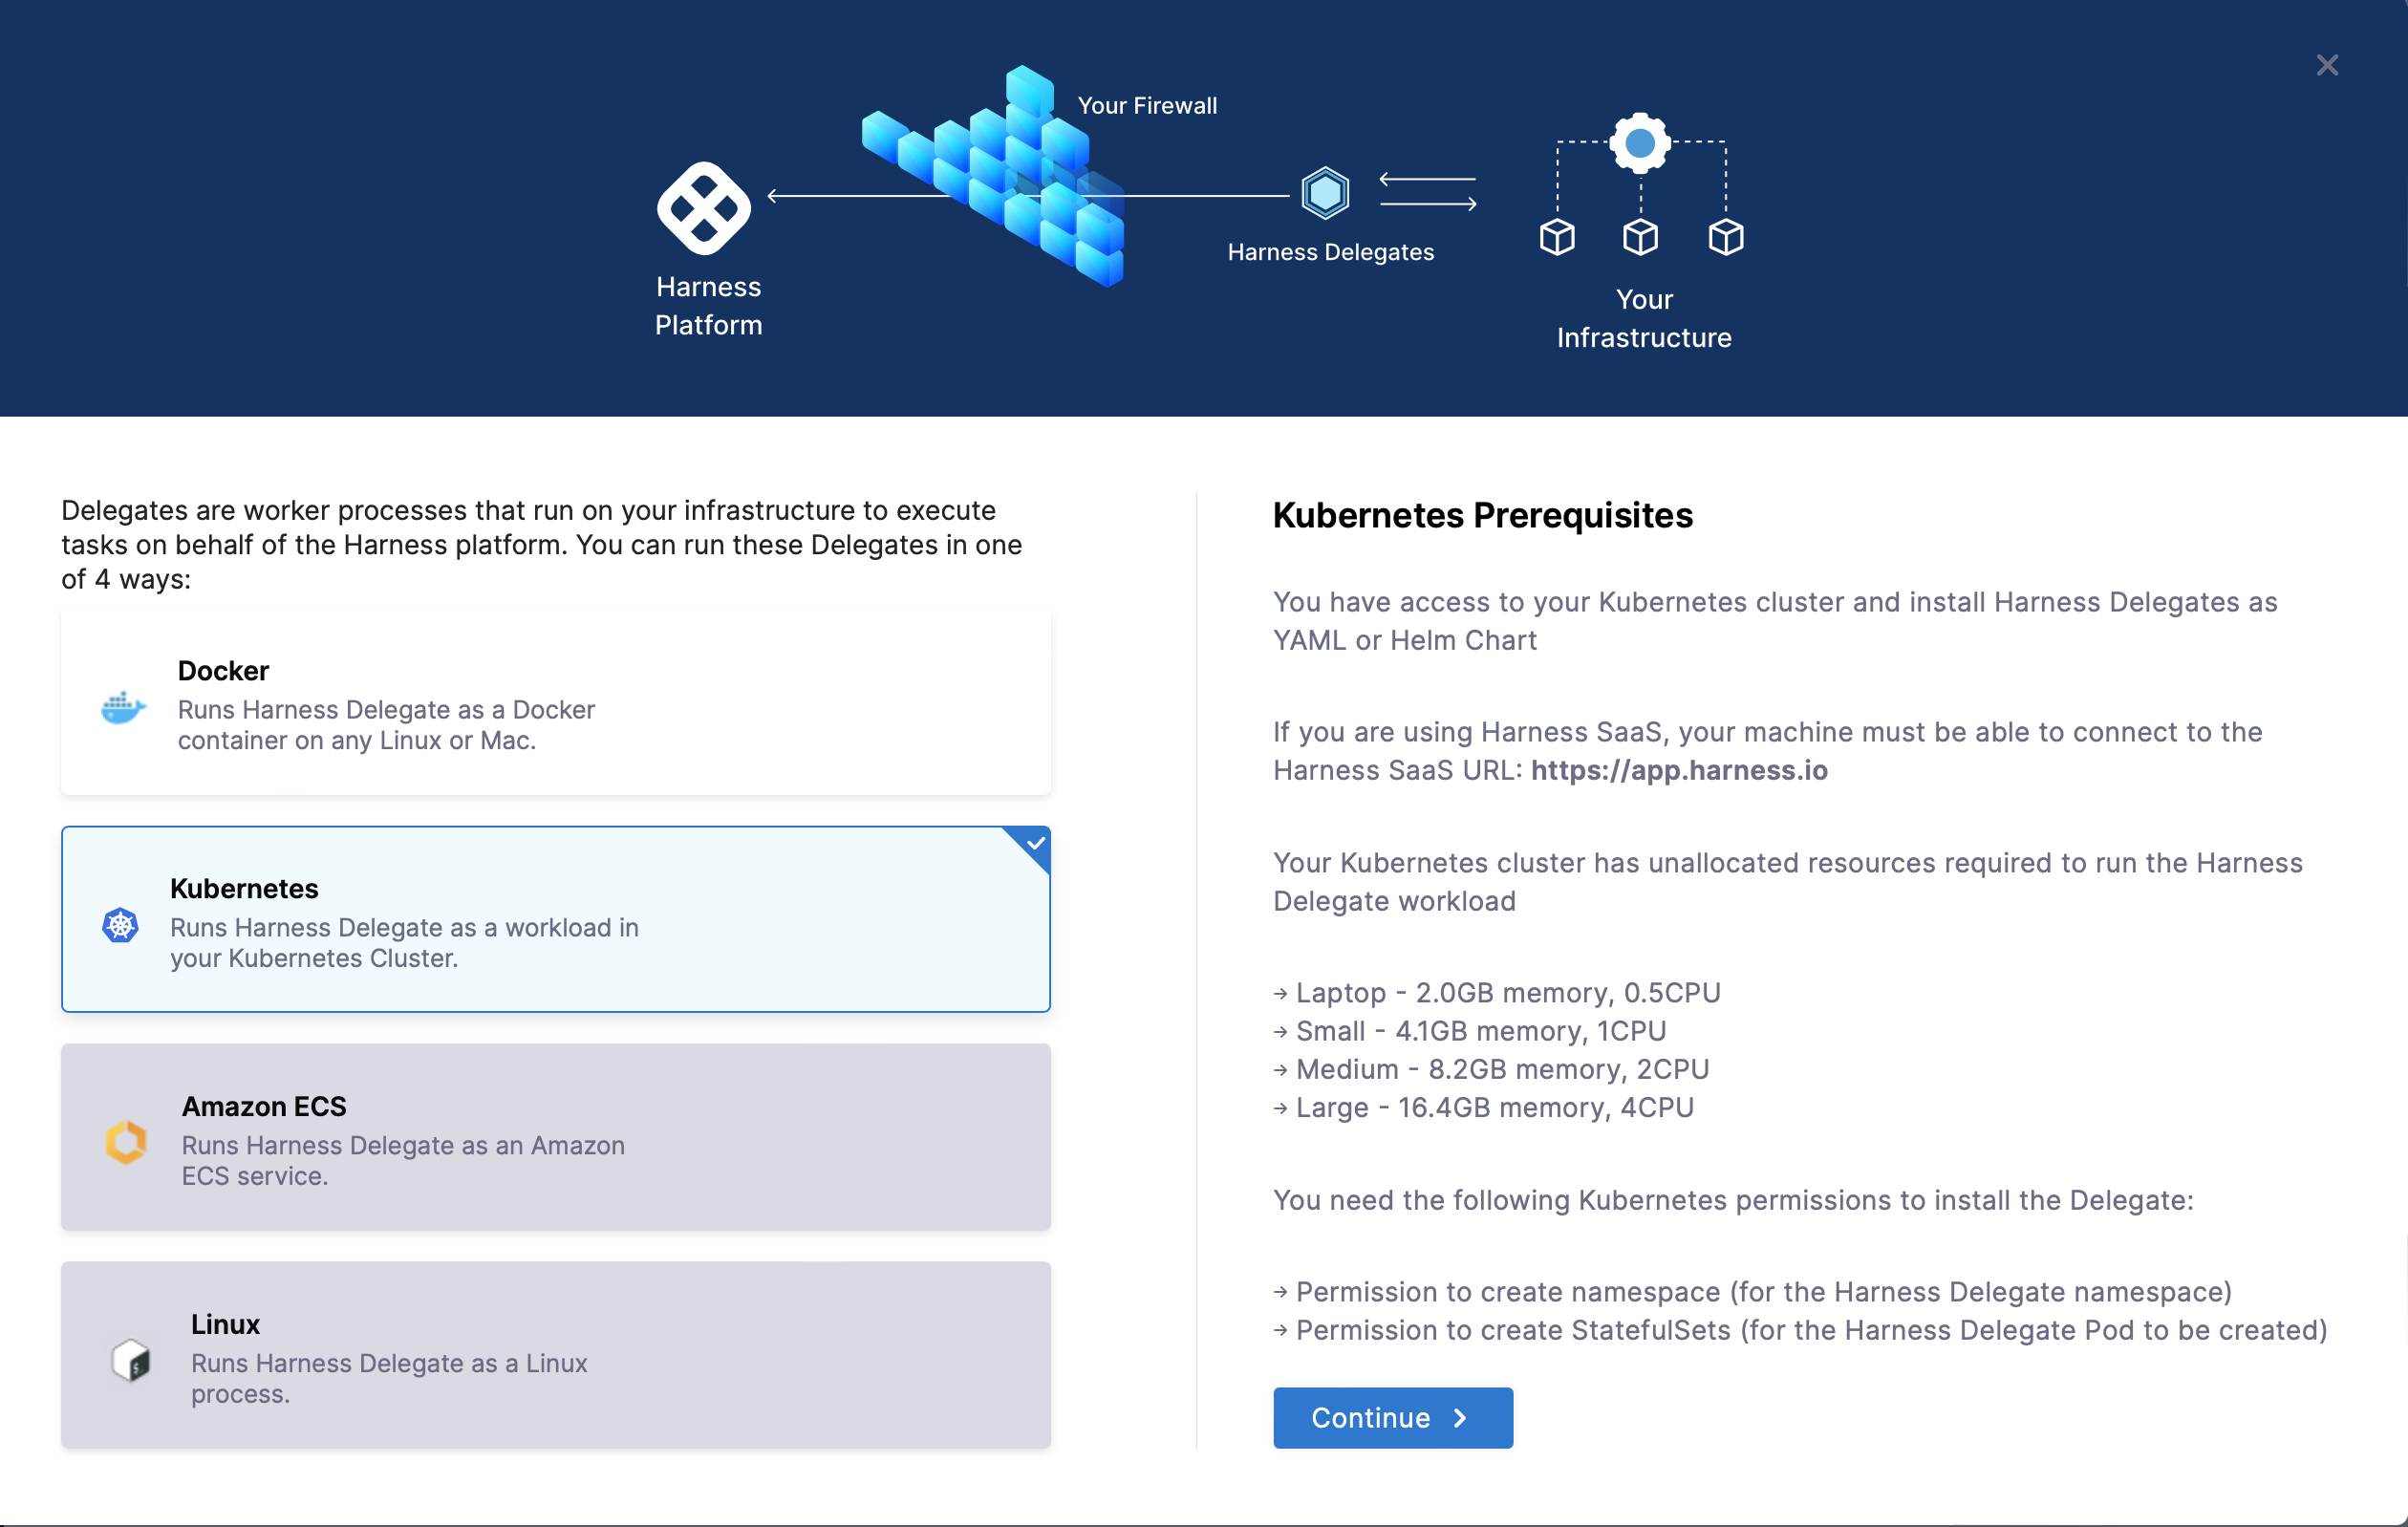
Below we have discussed the detailed explanation of how we can install Kubernetes(K8s) delegate.
Hypervisor technology (VirtualBox, VMWare, etc) is a mandate pre-requisite for Minikube and we have to choose the right one based on the platform we are on.
Installation section in the Minikube Getting Started documentation is well crafted and has steps for all Linux, Mac & Windows along with the architecture and installer type details and the user just has to choose the required details, get the commands and run them!
Go to Builds and under Project setup click delegates and then click on new delegates
Click on kubernetes
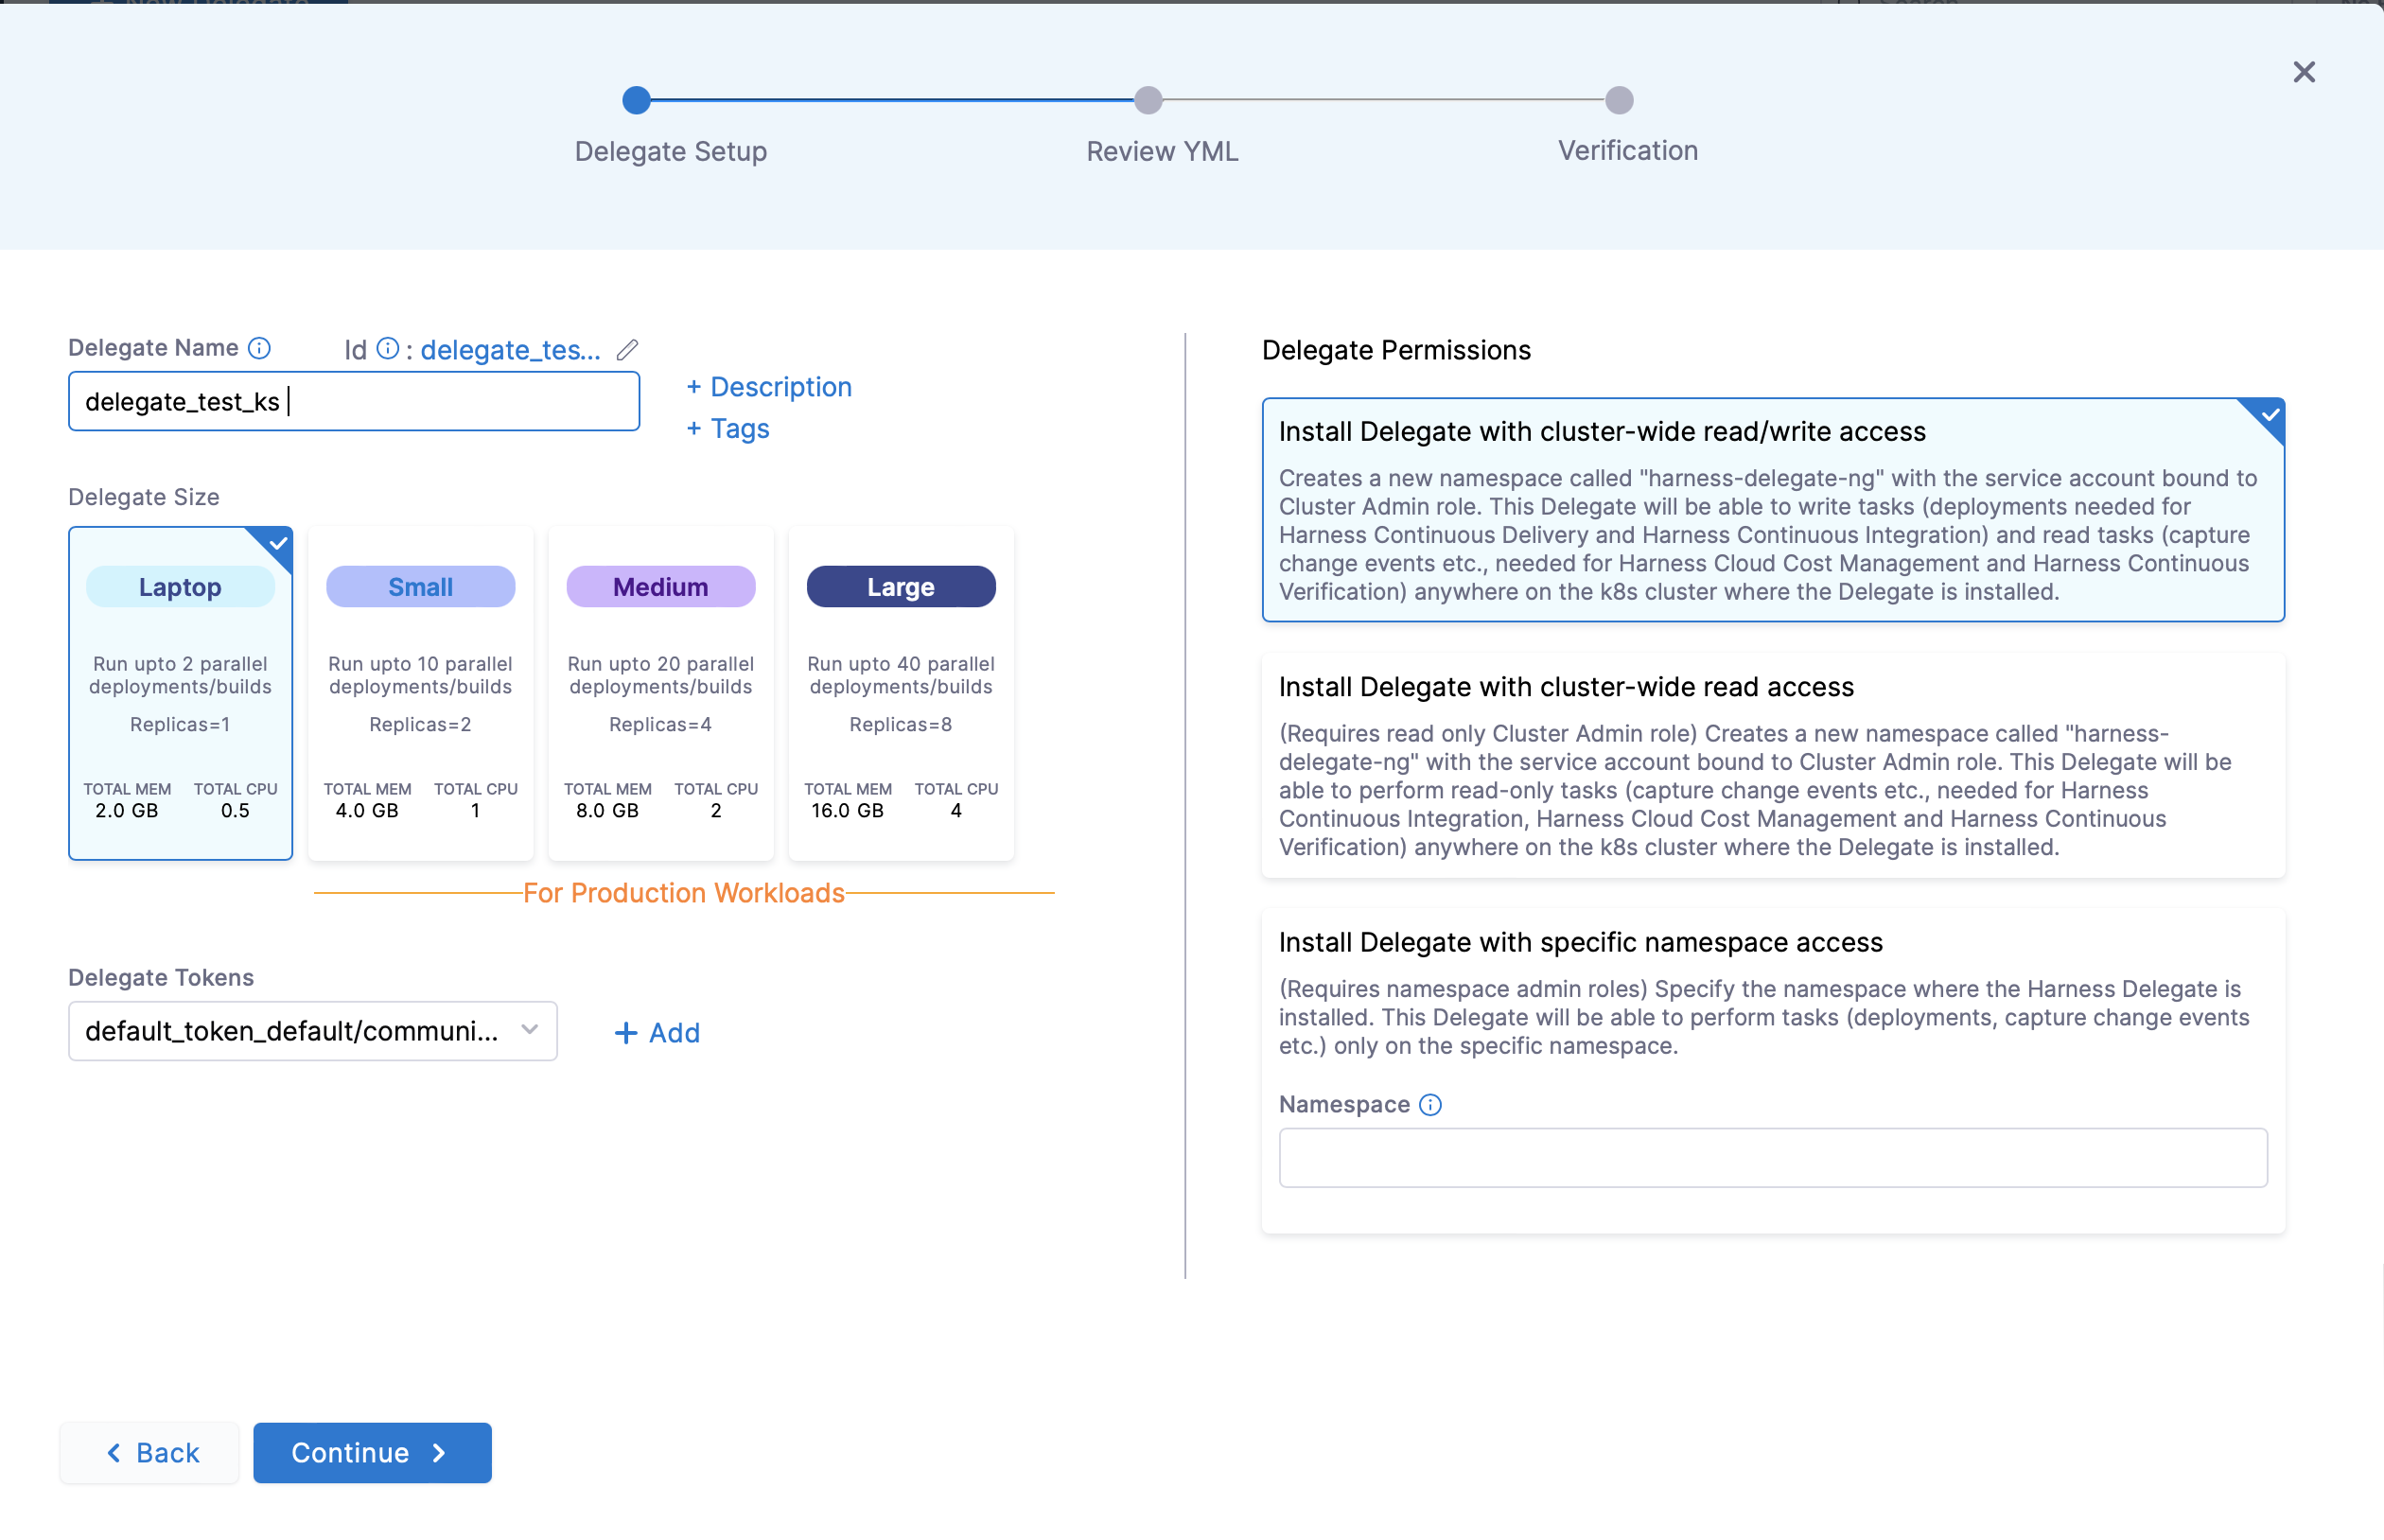
Name your delegate and select the size of delegate and also select delegate permissions.
Please follow the correct naming convention for naming a delegate.
It will show error when you insert any special characters except ‘-’ and make sure name should not start or end with a number
NOTE:These sizing requirements are for the Delegate only.Your cluster will require more memory for Kubernetes, the operating system, and other services,preferably one should have double the memory and node present in the cluster than that of required for the delegate for smooth functioning.
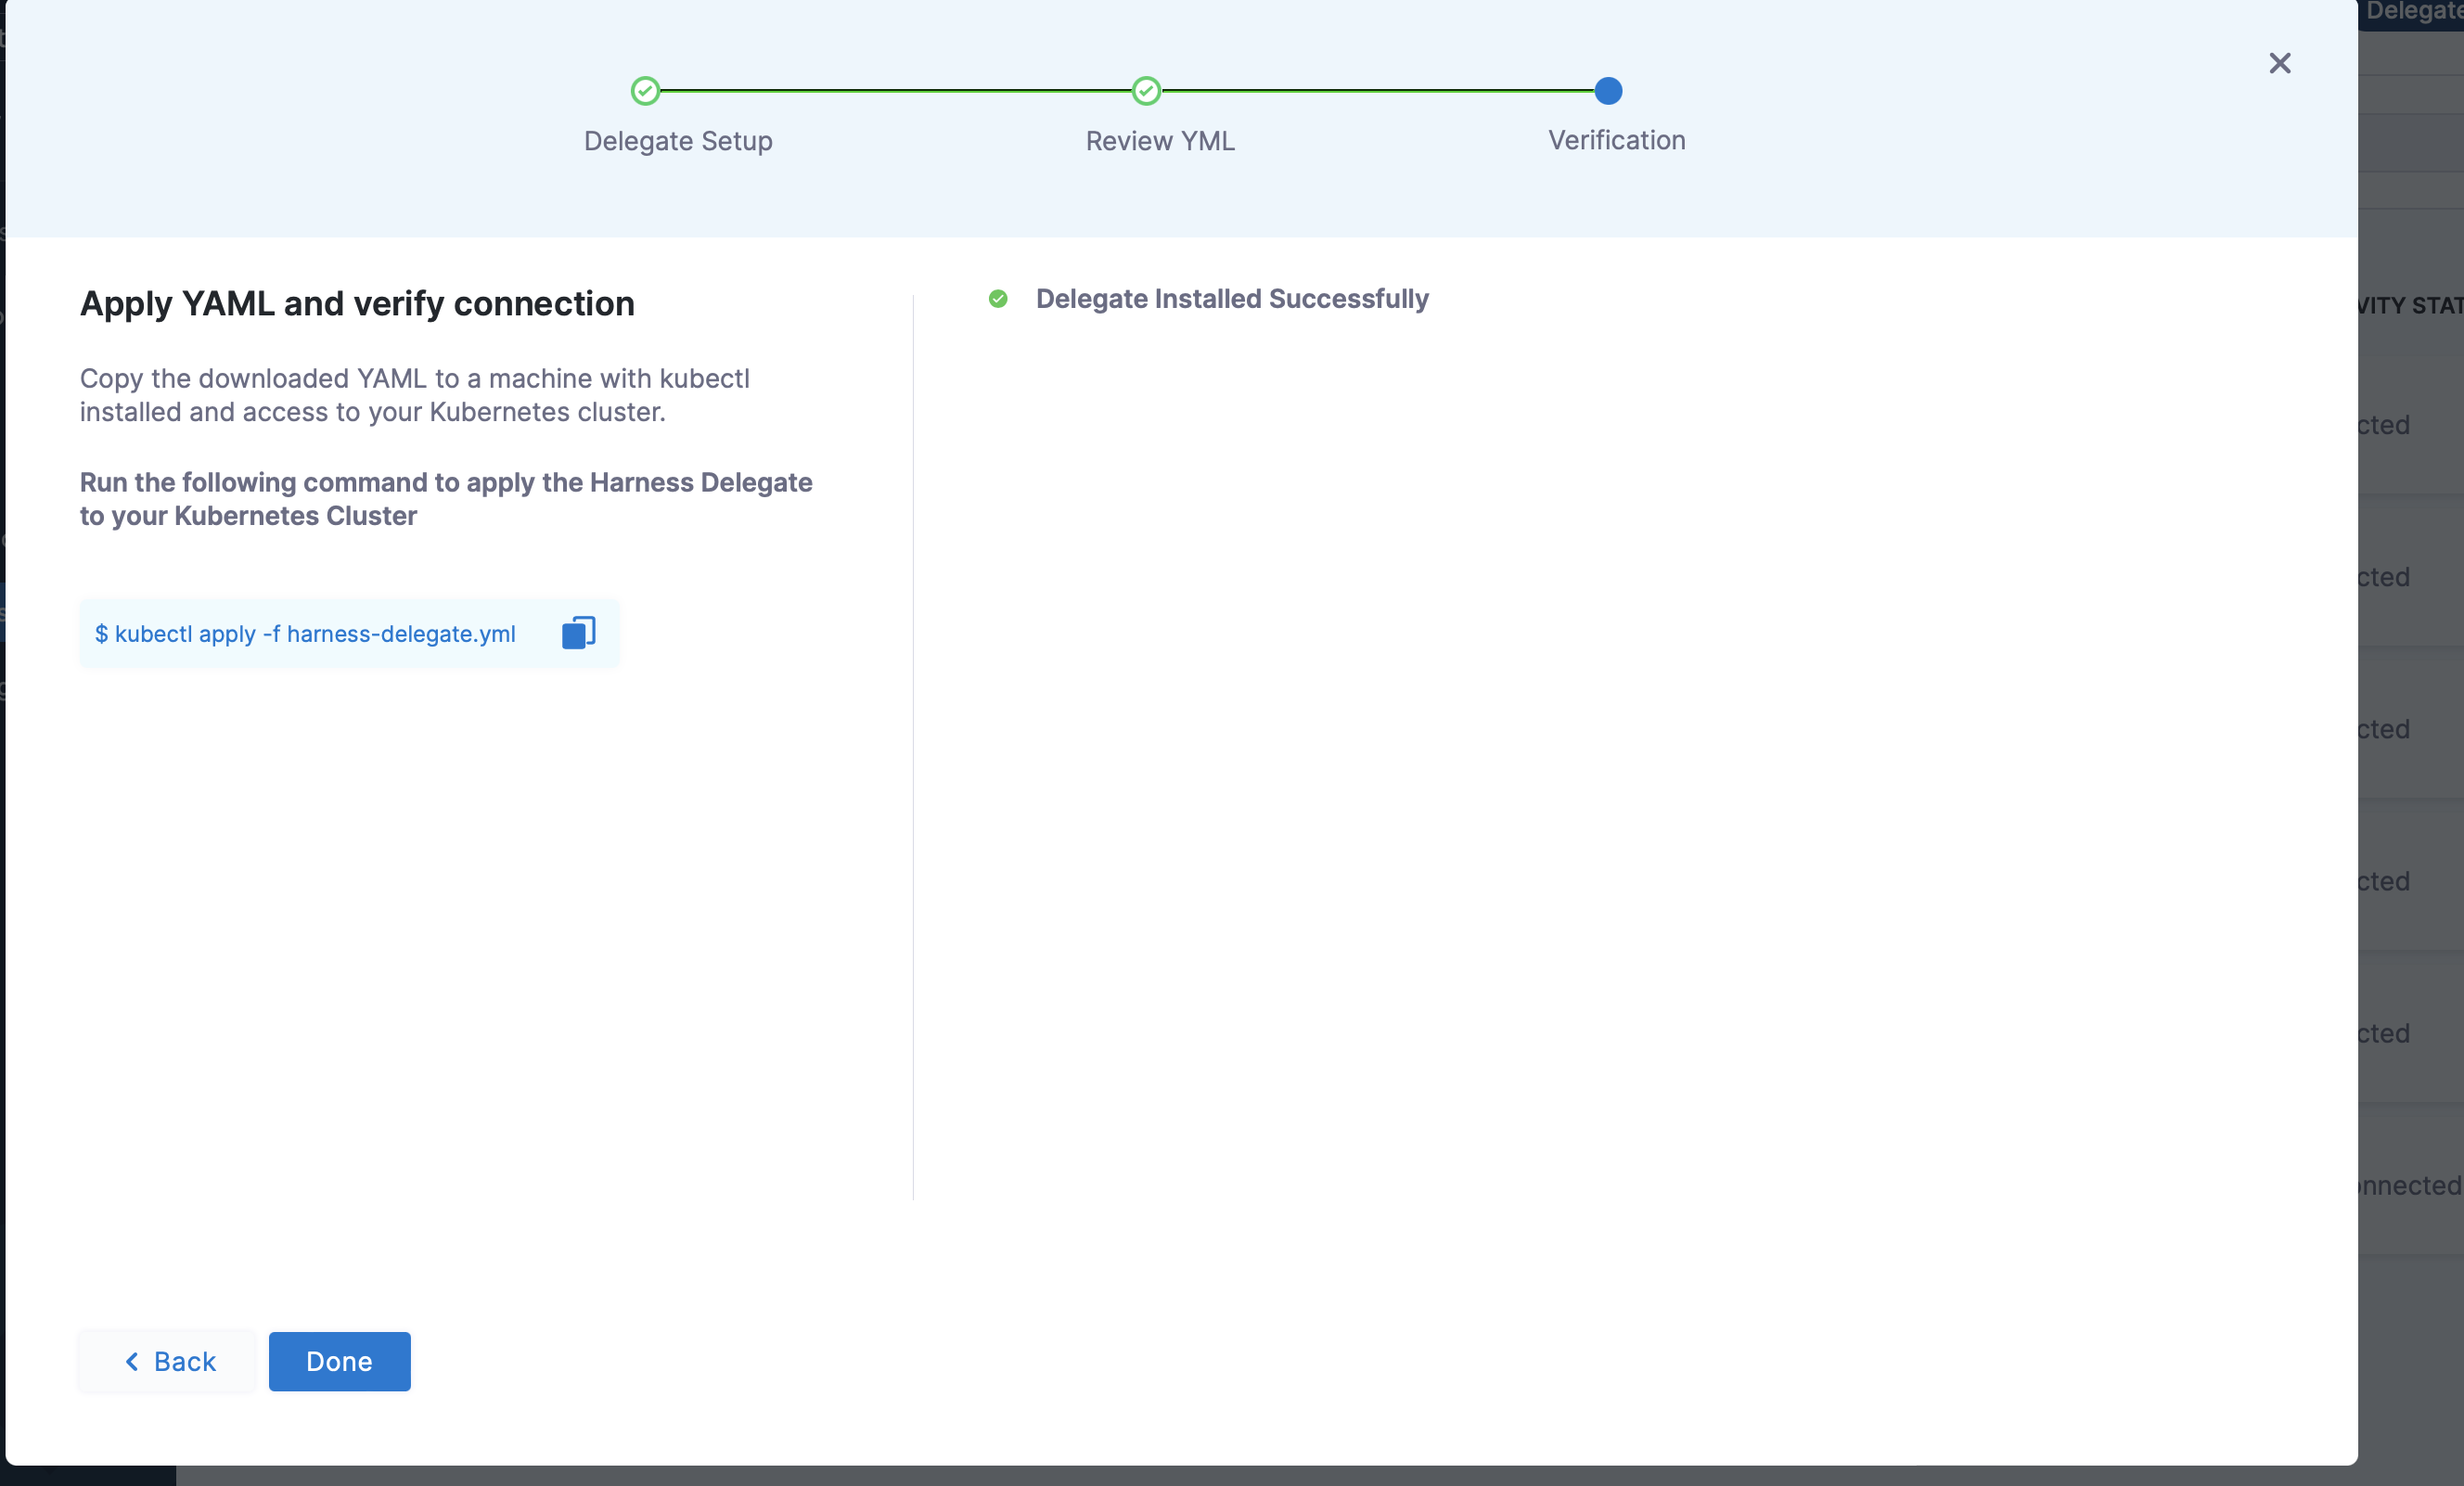
Download the yaml file
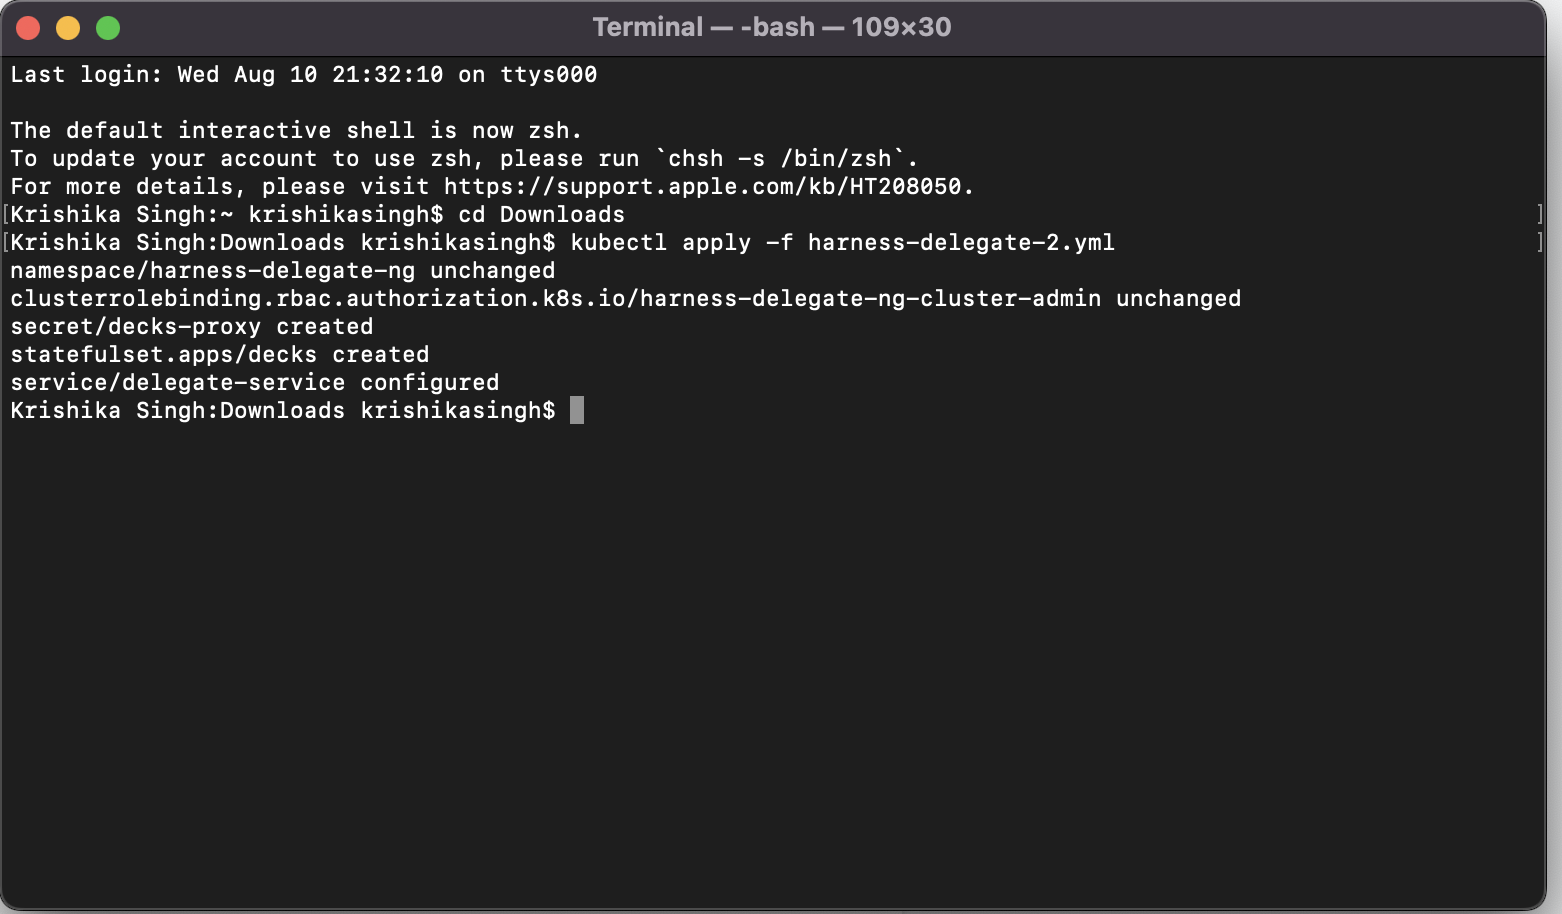
After clicking on continue open the new terminal and open the directory where you have downloaded the yaml file and then run the following command:
kubectl apply -f harness-delegate.yml
It may take few minutes for verification,after successful installation of delegate following message will be displayed:
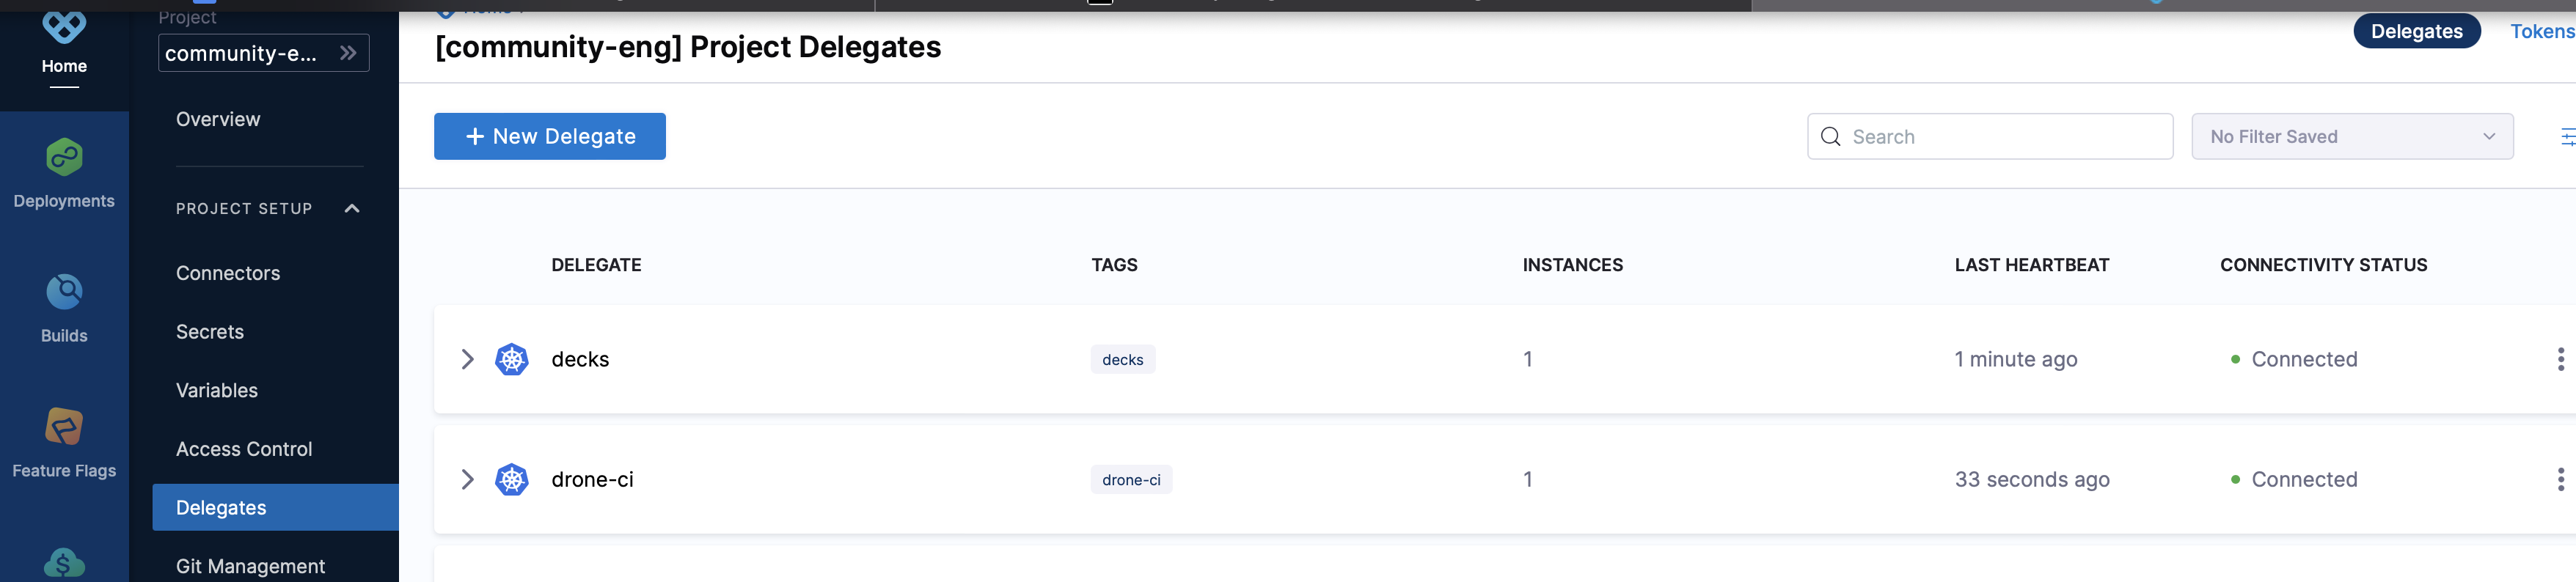
You can go to the delegate section in the project setup and see the delegate you have installed:
You can also delete your delegate when no longer in use
Note: Our Kubernetes Delegates are immutable , that is you can only create and delete the delegate but you can’t make any changes to them.
Hey !! new to the Harness Platform, we are here to help you find your way around.
Harness is the industry's first Software Delivery Platform to use AI to simplify your DevOps processes - CI, CD, Feature Flags, Cloud Costs, and much more.
Let's get started with a short introductory video about the harness platform.
Hope you have got an idea of how interesting is the Harness Platform.
Don't forget to signup at Harness platform to play around with the product.
Let's dive deep and explore our products so that we can help you around with your goals.
Before starting we highly recommend you to go through some basic key concepts about Harness Platform.
Harness CI(Continuous Integration)
Harness CI simplifies the development and testing of code. In Harness Pipelines, you visually model your build and test processes as CI Stages. Each Stage includes steps for building, testing, and pushing your code.
Well let's get you started with your first pipeline, and we are sure you are going to enjoy it, Harness has step by step guide for building different sample pipelines for different languages, you can try any one of them or all of them:
Harness CD is a Self-Service Continuous Delivery module that enables engineers to deploy on-demand without scripts, plugins, version dependencies, toil, downtime, and anger.
In each Stage, you define what you want to deploy using Services, where you want to deploy it using Environments, and how you want to deploy it using Execution steps.
You can refer to the docs below and get familiar with some basics as well deployment tutorials.
You can go through the following docs to get familiar with the basics as well as deployment tutorials as well as sample CD pipeline for you to try out:
Empower product development teams to quickly release new features, with minimal risk. Test with a specified subset, or roll out to all customers.
Feature flags create private swim lanes for developers where they can ship the feature directly to customers and then control who sees it, get feedback and turn it on and off when needed.
We recommend you follow the below blog and implement your first feature flag, I am sure you are going to love the way it works:
Harness Cloud Cost Management empowers engineers with cloud cost visibility of their apps, microservices, and clusters. The best part? Tagging isn't required.
Harness provides curated docs as well as courses that can surely help you out with the concept of CCM:
Harness Service Reliability Management (SRM) module helps engineering and DevOps teams to balance feature velocity and bug fixes along with the stability and reliability needs in a production environment.
You can refer to the below docs as well as some organized courses and get yourself onboard with the basics as well the usage of Service Reliability Management:
Those who want to try out SRM, we recommend them to go through the Harness SRM Practitioner exam it will help you in gaining much deeper product knowledge:
Chaos engineering is the discipline of experimenting with a software system in production to build confidence in the system's capability to withstand turbulent and unexpected conditions.
You can go through the below docs and learn more about chaos engineering, we recommend you go through the quick-start guide provided in the documentation and try out your first chaos experimentation:
Harness has structured courses on Chaos Engineering and those who want to try chaos engineering should surely give the Harness Chaos Practitioner Exam:
Harness Security Testing Orchestration (STO) enables DevOps and DevSecOps teams to left shift security testing. STO orchestrates scanning, intelligently deduplicating scanner output, prioritizing remediations, and enforcing governance into your Pipeline.
STO puts scanning directly into your Pipelines to ensure that vulnerabilities are caught and fixed before your products are ever released.
You can surely have a look in the below video about the introduction as well as a demo of STO:
You can go through the below docs and get through the basics of the product:
We at Harness are always there to help our community, feel free to slack us on our Community Slack channel (P.S don't forget to join the channel). You can also reach out to us at discourse.
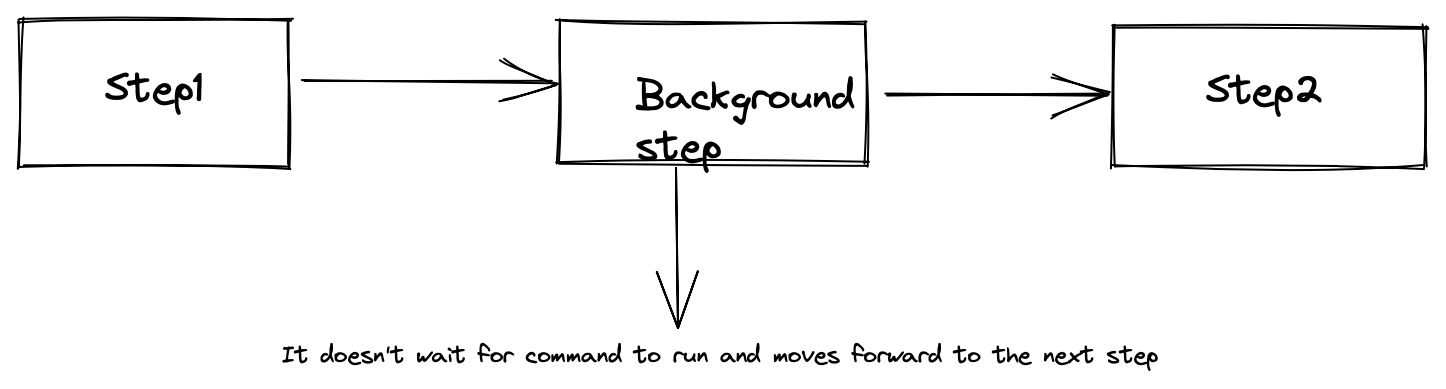
Background steps are useful for running services that need to run for the entire lifetime of a build. This can be used when user wants to run something in background throughout the stage execution or when you want to run an end to end test, redis service or mysql local service to run some operations
Before diving deep into background step further, let’s talk about service dependencies, how it helped and what were the shortcomings that service dependencies had that we have to introduce the background step
Service Dependency is a detached service that's accessible to all steps in a stage. Service dependencies support workflows such as
Integration testing: You can set up a service and then run tests against this service.
Running Docker-in-Docker: You can set up a dind service to process Docker commands in Run Steps.
Well you can see how important it was to introduce service dependency in your pipeline but then why did we introduce the background step?
Well service dependency did have some shortcomings which background step could solve easily for example:
Suppose you want to run a cypress server which needs some custom commands to start, you won’t be able to do that with a service dependency but with a background step as it accepts commands so with the help of that you can write a script and run any service.
Suppose you want redis,postgres and node js server to run together,with the help of service dependency you will have to define it separately but with the background step you can easily do that by adding a docker compose file ( the docker file either needs to be downloaded or we can easily use the one present in the git repo) and then doing docker-compose up with the help of command functionality.
We discussed about some of the shortcomings of service dependency that background step could solve, let’s have a detailed look on three of the major differences between the two:
Let’s say you are running some local server and you want to run some pre command or you want to fetch some file before running the server , there is an optional field called command in the background step. With the support of this optional functionality it acts as a run step now .
Background step can be added anywhere in the pipeline execution
The background step can be added anywhere during the pipeline execution, thus making it flexible for the user.
The background step supports templates that can be reused across Pipelines which enhance developer productivity,reduce onboarding time,and enforce standardization across the teams.
Also ,the background step supports sequential approvals, that is when one step is completed then only you can move to the other step,whereas service dependency was running all the commands at the same time.
A Background step starts a service and then proceeds. For any later step that relies on the service,it is good practice to verify that the service is running before you send requests.
If the pipeline runs on a VM build infrastructure, you can run the background service directly on the VM rather than in a container.To do this, leave the Container Registry and Image fields blank.
This beginner guide aims to help learners learn about the basic components of Harness CI and develop an understanding of the DevOps ecosystem involved in the Software Development lifecycle. In this article we will learn about the basic features of Harness CIE and also get started by building the first basic sample pipeline.
Engineering team is usually expected to deliver error-free code at high frequency. A fast and reliable CI/CD pipeline is a major part for implementation of that in a sustainable model over time. Harness Continuous Integration tool which is built with test intelligence, native secrets, fine-grained RBAC, and extensible governance as one of the best solutions in the marketplace for automated pipelines. Automated pipelines remove user errors, provide feedback loops to developers and helps enable fast product iterations.
What is a pipeline?
A Pipeline is an end-to-end process that delivers a new version of your software. It can be considered to be a cyclical process that includes integration, delivery, operations, testing, deployment, real-time updates, and metrics monitoring.
For example: A pipeline can use the CI module of Harness to build, test & push code and then also a CD module to deploy the artifact to the production environment.
Kubernetes cluster for Harness Delegate and build farm.
You'll need a Kubernetes cluster for Harness to use for the Harness Delegate and as a build farm. Ensure you have a cluster that meets the following requirements:
Number of pods: 3 (two pods for the Harness Delegate, the remaining pod for the build farm).
Machine type: 4vCPU
Memory: 16GB RAM. The build farm and Delegate requirements are low but the remaining memory is for Kubernetes, the Docker container, and other default services.
Networking: Outbound HTTPS for the Harness connection, and to connect to Docker Hub. Allow TCP port 22 for SSH.
Namespace: When you install the Harness Delegate, it will create the harness-delegate namespace. You'll use the same namespace for the build farm.
A Kubernetes service account with permission to create entities in the target namespace is required. The set of permissions should include list, get, create, and delete permissions. In general, the cluster-admin permission or namespace admin permission is enough.
For more information see User-Facing Roles from Kubernetes.
This tutorial implements creation of a pipeline over a github repository thus you’ll be required to create a github account & host a project over a repository. To create a new repository on github follow these steps:
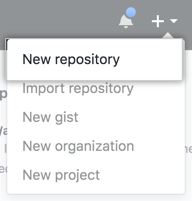
Move to the upper-right corner on the github webapp & use the drop-down menu to select New repository option.
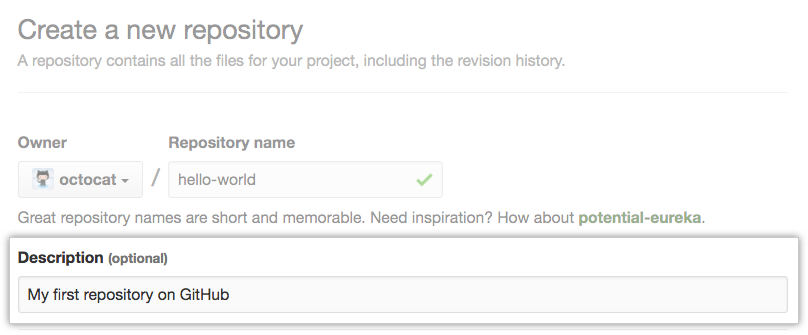
Type the name of the repository. The repository name is unique & cannot be same as already hosted repo names.
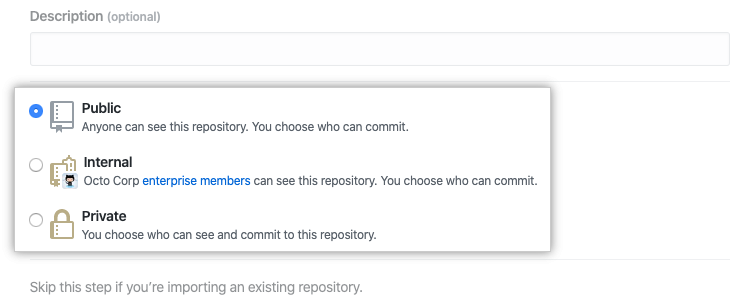
Select the repository visibility & click on create repository.
To get started with Docker Engine make sure you meet the prerequisites then install Docker. Older versions of Docker were called docker, docker.io, or docker-engine. If these are installed uninstall them with this command.
Installation of K8s Delegate for Harness Delegate
Harness Delegate is the service that connects all the components of the pipeline i.e artifact, infrastructure, collaboration, verification and other providers with the Harness Manager. It performs all the operations in the deployment lifecycle. Here we’ll install Kubernetes Delegate.
Move to the Harness Platform, in the Manager section click on setup and select Delegates.
In the delegates tab, click on the install delegate option with preference to Kubernetes YAML as the download type.
Update the name and profile and download the K8s Delegate or copy the download link.
Navigate to the harness-delegate-kubernetes folder that you extracted in the terminal using the following command
tar -zxvf harness-delegate-kubernetes.tar.gz

cd harness-delegate-kubernetes
With this you will directly connect with your cluster from the terminal and thus can easily copy the YAML file over.
To verify the connection of your created K8s Delegate with the Harness Platform use the following command
wget -p https://app.harness.io/ -O /dev/null
Now we’ll install the harness delegate using the harness-delegate.yaml file using this command
kubectl apply -f harness-delegate.yaml
To verify that the delegate pod was created run the following command.
kubectl get pods -n harness-delegate
With this now you're ready to connect Harness to your artifact servers, clusters, and so on.
Harness CI is powered by Drone the most popular open source CI tool. It’s built for speed and developer experience. Onboarding it is simple and this is what this guide is about.
Harness alongside the open source counterpart Drone introduced new features to scale the developer onboarding experience and reduce the time involved in the process drastically as compared to the industry standards.
Harness CI’s major features are the following:
Containerized Steps (Zero Dependencies)
Visual Pipeline Builder with YAML Config as Code
Git Operations, Secrets & Fine grained RBAC for security etc
Pipelines are a group of one or more stages. They are responsible for managing and automating builds, testing, deployments, and other important build and release stages.
To create a new Pipeline in Harness CI follow the steps below:
Move to the Harness Platform, click on projects. Create a new project incase you haven’t already created one.
Move to the modules section and click on Continuous Integration & click on create a new pipeline.
Enter the name for the pipeline & click on start. It usually takes 2-4 min for the provisioning stage of the pipeline.
The backbone of the pipeline is the build stage. This is where the user specifies the pipeline configuration details as the codebase to build, the infrastructure, the build workflow and all other additional components. The next step involves establishing the connection of the pipeline with the external resource. We use a connector in Harness CIE to develop this pipeline connection. The connector is a configurable object that automatically establishes connection to an external resource.
To create the Build Stage follow the steps given below:
Move to the newly created pipeline in the Pipeline Studio, add a stage & select build.
Add a stage name & under the configure codebase select connect connector.
Click on New Creator & give preference to Github Connector from all the available options for connector type.
To configure the connector successfully provide the following details i.e
a. URL Type as a Repository
b. Connection Type as HTTP
c. GitHub Repository URL
You’ll also have to verify the github username & PAT’s to make use of the connector. These secrets are stored in the Harness Secret Manager.
Once the connector has been configured with the necessary credentials select Enable API Access.
The connectivity medium can be directly through Harness Platform or through an delegate service running in an external resource.
In this guide we’ll install the delegate into the K8s cluster. Select Connect Through An Harness Delegate from the available options.
Install the new delegate with infrastructure type as Kubernetes.
Configure the delegate information as Name, Size, Permissions etc & install the delegate using the workspace definition YAML file that can be installed directly to the build infrastructure.
Download the YAML script and run it on the previously created cluster from the terminal.
Login to the K8s cluster from the same terminal and click on connect option.
Install the Harness Delegate using the harness-delegate.yaml file using the following command.
$ kubectl apply -f harness-delegate.yaml
Set up the Delegate with the necessary configuration from the Delegate Setup option.
Once the delegate is setup successfully you’ll see the connector & repo details in the About your stage component.
Select on setup stage and the new stage will be added to the pipeline.
The next step is to set up & define the Build Farm Infrastructure under the pipeline configuration settings. To setup the BFI follow the steps below:
Select the newly created K8s cluster & create a new connector. Specify details as Name, Details, Delegates Setup & Connection Test.
Once verified click on Finish to add the new connector to the K8s Cluster Field.
Verify the namespace carefully and move to the Execution component of the pipeline.
Now we can build & run tests over & against the hosted code. Move to the Execution Tab of the pipeline & add the step to run the steps. Follow the following steps to setup the Execution workflow of the pipeline:
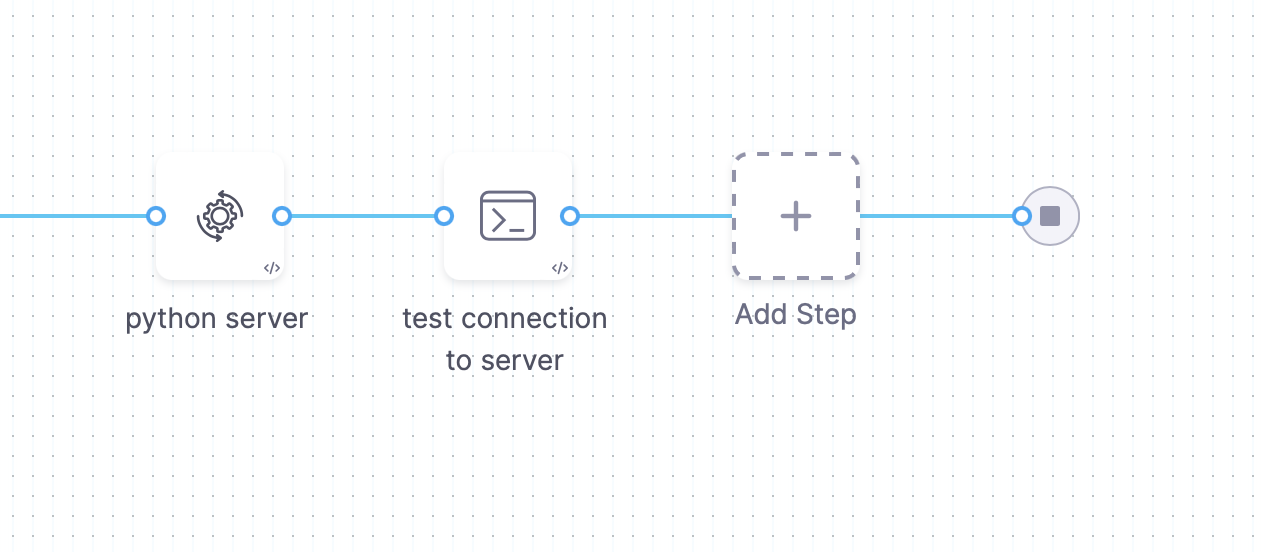
Add a run step to the pipeline & configure it as follows:
Give the step an appropriate name
Click on add a new connector option under the container registry option.
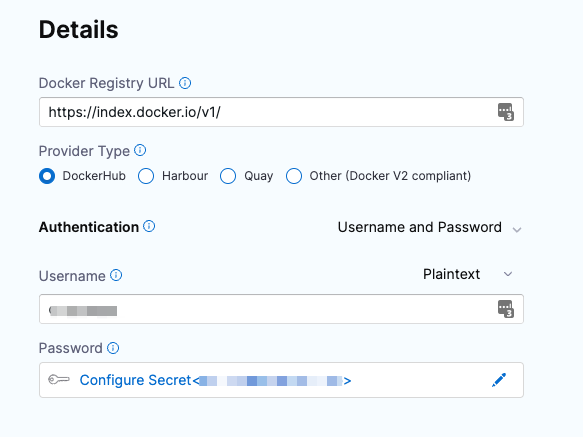
Select the connector type as Docker Registry
We’ll now create a new connector to the DockerHub account. Specify the account credentials and configure the secrets.
Verify the connection test & once successful click on Finish. Now we can Configure Run Step pane, with the new Connector in the Container Registry setting.
Configure the step as follows:
Give an appropriate step name.
The Container Registry should show the Docker Hub Connector you just created.
Image: golang:1.15
Command:
go get gotest.tools/gotestsum gotestsum --format=standard-verbose --junitfile unit-tests.xml ||true CGO_ENABLED=0GOOS=linux GOARCH=amd64 go build -a -tags netgo
The last line contains the go build command to compile the package, along with its dependencies. Once configured click on Apply changes & save the pipeline.
Now we can add the step to build & push the created image into the DockerHub repository. A repository in DockerHub is required to receive the artifacts from the pipeline. Add a step and specify the DockerHub account credentials.
Configure the step as follows:
Select Name as the Step name you defined earlier.
Select the Docker Hub Connector you set up previously.
Paste the docker repository URL & specify the tags: <+pipeline.sequenceId>
After successfully configuring the step components select Apply Changes & save the pipeline.
The pipeline is now ready for execution & can be used for running tests.
You can also add the Integration Tests to the pipeline. To execute the pipeline click on Run. Select Git Branch and the git branch name when prompted such as main and click on Run Pipeline
You can view the logs of each step by clicking on it or else can also switch to the console view for more tracking down the micro details.
The entire pipeline is also available in YAML. You can directly make changes to the YAML file and save the changes and it will automatically be reflected in the pipeline when executed.
Developers spend a lot of time into coding & solving the engineering problems. With Harness CIE we can now easily cut down the operational & functional time cost drastically. The added advantage to the features of CIE is the User Interface of CIE which is sleek and easy
& solves major issues of longer build and testing time. Harness CIE automatically scales up the build, test and deploy cycles.
The product focuses on developers & is completely developer-centric built around what a developer seeks to be the one stop solution for CI/CD.
Now, it's easy to submit your blog/articles and it's just a PR away!
Simply create a PR by adding Markdown files (or folders) to the blog directory in harness-community.github.io repository!
A blog post folder can be convenient to co-locate blog post images abd can be displayed like below:
Oh and the other cool thing is, you can directly embed Youtube videos to your blog post and users can watch it on the same page and of course on a new tab if they want to;)
The blog supports tags as well! so refer the list of available tags and add it to your blog post!
Stay tuned for more improvements as this site is still in development phase:)