
3 posts tagged with "harness-ci"

View All Tags

· 6 min read
Dhrubajyoti Chakraborty

Introduction

This beginner guide aims to help learners learn the configuration management for run steps settings in Harness CI. We will learn about different settings and permissions for the Harness CI Run Tests step which executes one or more tests on a container image.

Before We Begin

Are you confused with terminologies like Container Resources, Image Pull Policy etc while creating & configuring a run step for your CI pipeline? In this article we will discuss a few such terminologies on the Harness CI platform and how you can configure them to set up your run step in the pipeline settings according to your requirements.

Configuration Parameters in a Run Step

  • Name
  • ID
  • Description
  • Container Registry
  • Image
  • Namespaces
  • Build Tool
  • Language
  • Packages
  • Run Only Selected Tests
  • Test Annotations
  • Pre-Command & Post-Command
  • Report Paths & Environment Variables
  • Output variables
  • Image Pull Policy
  • Container Resources

Name

The unique name for the run step. Each run step must have a unique name & it is recommended to use a name which describes the step.

ID

Most of the Harness entities and resources include a unique Id also referred as entity Identifier that's not modifiable once the entity is created. It provides a constant way to refer to an entity and avoid issues that can arise when a name is changed.

Initially Harness automatically generates an identifier for an entity which can be modified when you are creating the entity but not after the entity is saved.

Even if you rename the entity the Identifier remains the same. The automatically generated Identifier is based on the entity name and follows the identifier naming conventions. If an entity name cannot be used because it's already occupied by another entity Harness automatically adds a prefix in the form of -1, -2, etc.

Check out the documentation to know more about Entity Identifier Reference

Description

This is generally a text string describing the run step and it’s working.
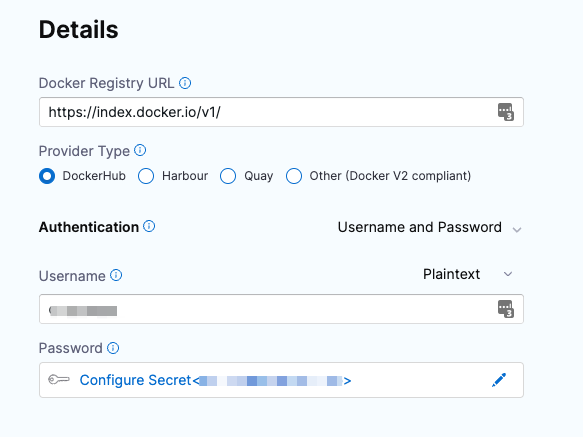
Container Registry

Container Registry refers to the Harness Connector for a container registry. This is the container registry for the image Harness will use run build commands on such as DockerHub.

Check out the documentation to know more about Harness Container Image Registry

Image

Image is the name of the Docker image to use when running commands.For example: alpine-node This image name should include the tag and will by default refer to the latest tag if not specified. You can use any docker image from any docker registry including docker images from private registries.

Different container registries has different name formats:

  • Docker Registry: enter the name of the artifact you want to deploy, such as library/tomcat. Wildcards are not supported.
  • GCR: enter the name of the artifact you want to deploy. Images in repos need to reference a path starting with the project ID that the artifact is in, for example: us.gcr.io/playground-243019/quickstart-image:latest.
  • ECR: enter the name of the artifact you want to deploy. Images in repos need to reference a path, for example: 40000005317.dkr.ecr.us-east-1.amazonaws.com/todolist:0.2.

Namespaces (C#)

A comma-separated list of the Namespace prefixes that you want to test.

Build Tool

This is where you select the build automation tool & the source code language to build, such as Java or C#.

Packages

This are the list of source code package prefixes separated by a comma. For example: com.company., io.company.migrations

Run Only Selected Tests

If this option is unchecked, Test Intelligence is disabled and all tests will run.

Test Annotations

This is where you enter the list of test annotations used in unit testing separated by commas. Any method annotated with this will be treated as a test method. The defaults are: org.junit.Test, org.junit.jupiter.api.Test, org.testng.annotations.Test

Pre-Command & Post-Command

In pre-command you enter the commands for setting up the environment before running the tests. For example, printenv prints all or part of the environment.

In post-command you enter the commands used for cleaning up the environment after running the tests. For example, sleep 600 suspends the process for 600 seconds.

Report Paths

This refers to the path to the file(s) that store results in the JUnit XML format. You can enter multiple paths. Glob is supported.

Environment Variables & Output Variables

Environment variables refers to the variables passed to the container as environment variables and used in the Commands.

Output variables expose Environment Variables for use by other steps/stages of the Pipeline. You can reference the output variable of a step using the step ID and the name of the variable in Output Variables.

output-var

Image Pull Policy

This is where you make the choice to set the pull policy for the image.

  • Always: The kubelet queries the container image registry to resolve the name to an image digest every time the kubelet launches a container. If the kubelet encounters an exact digest cached locally, it uses its cached image; otherwise, the kubelet downloads (pulls) the image with the resolved digest, and uses that image to launch the container.

  • If Not Present: The image is pulled only if it isn't already present locally.

  • Never: The kubelet assumes that the image exists locally and doesn't try to pull the image.

Container Resources

The container resources configuration specifies the maximum resources used by the container at runtime.

Limit Memory Maximum memory that the container can use. You can express memory as a plain integer or as a fixed-point number using the suffixes G or M. You can also use the power-of-two equivalents Gi and Mi.

Limit CPU The maximum number of cores that the container can use. CPU limits are measured in cpu units. Fractional requests are allowed: you can specify one hundred millicpu as 0.1 or 100m.

See Resource units in Kubernetes

note

This is not applicable in case you have opted for Hosted by Harness in your Infrastructure settings of the step.

Timeout

This specifies the timeframe until which the step shall execute. Once the timeout is reached the step fails and the Pipeline execution continues.

NOT ABLE TO TROUBLESHOOT THE ENCOUNTERED ERROR

In case the user is unable to troubleshoot the application error or pipeline execution failures the user can log/submit a ticket to Harness Support. To log a ticket follow the process:

  1. Click the Help button in the Harness Manager
  2. Click Submit a Ticket or Send Screenshot
  3. Fill out the pop up form and click Submit Ticket or Send Feedback

· 7 min read
Dhrubajyoti Chakraborty

Introduction

This is a guide to get started with the common use cases for the end users to implement pipeline executions successfully in Harness CI

Harness provides various sources & tools to easily troubleshoot frequently encountered errors to fix pipeline failures. This guide lists some of the common issues faced while implementing and designing pipelines in Harness CI and the possible solutions.

What’ll we be covering here?

  • Syntax Verification
  • Variable Verification
  • Troubleshooting Delegate Installation Errors
  • Troubleshooting Triggers Errors
  • Troubleshooting Git Experience Errors

Verify Syntax

An early-stage error use case is generally incorrect syntax. In such cases, the pipeline returns an invalid YAML syntax message and does not start running in case any syntax error is detected.

Edit pipeline.yaml in the pipeline studio

The pipeline editor in the YAML view is recommended for editing experience (rather than the graphical stage view). Major features in the editor include:

  • Creation of connectors, secrets & pipelines from scratch
  • Realtime schema validation
  • Intellisense & auto-completion
  • Field descriptions & rich inline documentation
  • Free Templates for YAML Samples

This feature helps the developer to validate the existing pipeline’s correctness and helps in quick modification alongside copying of a pipeline as a code.

Verify Variables

A very integral part of troubleshooting errors in Harness CI is to verify the variables present in the pipeline and their values. Major configuration in the pipeline depends on the variables and verifying them becomes the easiest way to reach the root cause and potential solution of the problem.

Visit the variables section on the Harness CI platform. Check if the expected variables and their values match and are implemented at the expected stage for the pipeline.

Delegate Setup Failure

The majority of the encountered errors in Harness CI revolve around delegate setup processes. Make sure you have a complete understanding of how to set up a harness delegate from scratch & understand how the Harness manager and delegate complement each other.

Delegate setup also fails if the SSH key used for deployment to the targeted host is incorrect. This usually happens due to incorrect information about the SSH configuration in the Harness Secrets Management and also if the targeted host is not configured to support SSH connections.

For troubleshooting move to the watcher.log file that provides information about the deleted version.

Delegate fails to establish a connection with the Harness Manager

In case of connection failures for the delegate with the Harness Manager, we can use ping on the delegate host to test the response time for app.harness.io and other URLs are consistent or not. We can use the traceroute to check the network route and verify if there is any case of redirection. To verify if the DNS resolution is working fine we can implement nslookup. We can flush the client's DNS cache (Check for the OS). We can run tests to check for local network errors or NAT license limits. In the case of cloud service providers, we’ll have to ensure that the security groups have outbound traffic allowed on HTTP 443.

No eligible delegate found for the assigned pipeline execution

This error is encountered when the delegate fails to achieve the URL criteria for validation. All delegates in harness are identified by their Harness account ID with some additional factors. For example, in VMs the delegates are identified with the combination of their hostname and IP address thus in case the IP changes the Harness Manager fails to identify the delegate. In the case of K8s and ECS delegates, the IP changes when the pod is rescheduled.

The delegate sends the heartbeat, deployment data & Time series, and log data for continuous verification to the Harness Manager. The credentials used by the Delegate must have the roles and permissions required to perform the task. For example, if the account used for an AWS Cloud Provider does not have the roles required for ECS deployments then it will fail.

For more information visit How does Harness Manager Identify Delegates?

K8s Delegate Deletion Failure

To delete the Harness Delegate from the K8s cluster we’ll have to delete the StateFulSet for the delegate. This ensures that the expected number of pods is running and available. Deletion of the delegate without deletion of the StateFulSet results in a recreation of the pod.

For example, if the delegate name is delegate-sample then we can delete StateFulSet with the command below

$ kubectl delete statefulset -n harness-delegate delegate-sample

Triggers Rejection Failures

This usually happens when the user uses a webhook trigger to execute a pipeline or workflow and the name of the artifact in the cURL command is different from the name of the artifact.

Trigger Rejected. Reason: Artifacts Are Missing for Service Name(S)

This is majorly a result of a bad name for an artifact build version when placed in the cURL command. For example a cURL with build number v1.0.4-RC8:

curl -X POST -H 'content-type: application/json'
--url https://app.harness.io/gateway/api/webhooks/... . .
-d '{"application":"tavXGH . . z7POg","artifacts":[
{"service":"app","buildNumber":"v1.0.4-RC8"}]}'

In case the Harness Service artifacts have a different nomenclature the cURL command will fail to execute. Thus ensuring the webhook cURL command has the correct artifact name becomes very important.

Failure when executed Git Push in Harness

In case of two-way sync between the Git repository and the Harness Application, the push to Harness will result in failure unless the GIT YAML files and the required settings are configured before pushing the app to Harness.

For example, in case we have a predefined infrastructure definition and the required labels or parameters are not filled or filled in incorrectly the push to git is more likely to encounter a failure.

Using the Harness Manager to configure the app at first is the best way to encounter this error. This generally ensures that all the required settings are configured correctly and synced with the git repository.

Triggers: zsh: no matches found

In some of the OS versions specifically in MACOS, the default shell is zsh. The zsh shell requires the cURL command to not use the “?” character or put quotes around the URL.

For example;

curl -X POST -H 'content-type: application/json' --url https://app.harness.io/gateway/api/webhooks/xxx?accountId=xxx -d '{"application":"fCLnFhwsTryU-HEdKDVZ1g","parameters":{"Environment":"K8sv2","test":"foo"}}'

This shall work

curl -X POST -H 'content-type: application/json' --url "https://app.harness.io/gateway/api/webhooks/xxx?accountId=xxx -d '{"application":"fCLnFhwsTryU-HEdKDVZ1g","parameters":{"Environment":"K8sv2","test":"foo"}}'"

User does not have "Deployment: execute" permission

The error User does not have "Deployment: execute" permission reflects back to the user’s Application Permission > Settings does not involve execute. This can be solved by resolving the application permission configuration. The user can easily modify the Harness Configure as Code YAML files for the harness application.

To enable editing of the YAML file make sure the user’s Harness User Groups must have the account permission Manage Applications enabled. Also the Application Permissions Update enabled for specific applications

NOT ABLE TO TROUBLESHOOT THE ENCOUNTERED ERROR

In case the user is unable to troubleshoot the application error or pipeline execution failures the user can log/submit a ticket to Harness Support. To log a ticket follow the process:

  1. Click the Help button in the Harness Manager
  2. Click Submit a Ticket or Send Screenshot
  3. Fill out the pop up form and click Submit Ticket or Send Feedback

· 10 min read
Dhrubajyoti Chakraborty

Introduction

This beginner guide aims to help learners learn about the basic components of Harness CI and develop an understanding of the DevOps ecosystem involved in the Software Development lifecycle. In this article we will learn about the basic features of Harness CIE and also get started by building the first basic sample pipeline.

Engineering team is usually expected to deliver error-free code at high frequency. A fast and reliable CI/CD pipeline is a major part for implementation of that in a sustainable model over time. Harness Continuous Integration tool which is built with test intelligence, native secrets, fine-grained RBAC, and extensible governance as one of the best solutions in the marketplace for automated pipelines. Automated pipelines remove user errors, provide feedback loops to developers and helps enable fast product iterations.

What is a pipeline?

A Pipeline is an end-to-end process that delivers a new version of your software. It can be considered to be a cyclical process that includes integration, delivery, operations, testing, deployment, real-time updates, and metrics monitoring.

For example: A pipeline can use the CI module of Harness to build, test & push code and then also a CD module to deploy the artifact to the production environment.

Prerequisites

Environment

  • Ubuntu 20.04/22.04

Requirements

  • Kubernetes cluster for Harness Delegate and build farm.
  • You'll need a Kubernetes cluster for Harness to use for the Harness Delegate and as a build farm. Ensure you have a cluster that meets the following requirements:
  • Number of pods: 3 (two pods for the Harness Delegate, the remaining pod for the build farm).
  • Machine type: 4vCPU
  • Memory: 16GB RAM. The build farm and Delegate requirements are low but the remaining memory is for Kubernetes, the Docker container, and other default services.
  • Networking: Outbound HTTPS for the Harness connection, and to connect to Docker Hub. Allow TCP port 22 for SSH.
  • Namespace: When you install the Harness Delegate, it will create the harness-delegate namespace. You'll use the same namespace for the build farm.

A Kubernetes service account with permission to create entities in the target namespace is required. The set of permissions should include list, get, create, and delete permissions. In general, the cluster-admin permission or namespace admin permission is enough. For more information see User-Facing Roles from Kubernetes.

This tutorial implements creation of a pipeline over a github repository thus you’ll be required to create a github account & host a project over a repository. To create a new repository on github follow these steps:

  1. Move to the upper-right corner on the github webapp & use the drop-down menu to select New repository option.

create-new-repository

  1. Type the name of the repository. The repository name is unique & cannot be same as already hosted repo names.

repo-name

  1. Select the repository visibility & click on create repository.

repo-public

create-repo

Installing Docker Engine

To get started with Docker Engine make sure you meet the prerequisites then install Docker. Older versions of Docker were called docker, docker.io, or docker-engine. If these are installed uninstall them with this command.

sudo apt-get remove docker docker-engine docker.io containerd runc

Check out this documentation to get your Docker Engine installed

Installation of K8s Delegate for Harness Delegate

Harness Delegate is the service that connects all the components of the pipeline i.e artifact, infrastructure, collaboration, verification and other providers with the Harness Manager. It performs all the operations in the deployment lifecycle. Here we’ll install Kubernetes Delegate.

  1. Move to the Harness Platform, in the Manager section click on setup and select Delegates.
  2. In the delegates tab, click on the install delegate option with preference to Kubernetes YAML as the download type.
  3. Update the name and profile and download the K8s Delegate or copy the download link.
  4. Navigate to the harness-delegate-kubernetes folder that you extracted in the terminal using the following command
tar -zxvf harness-delegate-kubernetes.tar.gz

cd harness-delegate-kubernetes

With this you will directly connect with your cluster from the terminal and thus can easily copy the YAML file over.

  1. To verify the connection of your created K8s Delegate with the Harness Platform use the following command
wget -p https://app.harness.io/ -O /dev/null
  1. Now we’ll install the harness delegate using the harness-delegate.yaml file using this command
kubectl apply -f harness-delegate.yaml
  1. To verify that the delegate pod was created run the following command.
kubectl get pods -n harness-delegate

With this now you're ready to connect Harness to your artifact servers, clusters, and so on.

About Harness CI

Harness CI is powered by Drone the most popular open source CI tool. It’s built for speed and developer experience. Onboarding it is simple and this is what this guide is about.

Harness alongside the open source counterpart Drone introduced new features to scale the developer onboarding experience and reduce the time involved in the process drastically as compared to the industry standards.

Harness CI’s major features are the following:

  1. Containerized Steps (Zero Dependencies)
  2. Visual Pipeline Builder with YAML Config as Code
  3. Git Operations, Secrets & Fine grained RBAC for security etc
  4. Test Intelligence
  5. Integrated Platform

Getting Started with your first pipeline

Pipelines are a group of one or more stages. They are responsible for managing and automating builds, testing, deployments, and other important build and release stages.

To create a new Pipeline in Harness CI follow the steps below:

  1. Move to the Harness Platform, click on projects. Create a new project incase you haven’t already created one.
  2. Move to the modules section and click on Continuous Integration & click on create a new pipeline.
  3. Enter the name for the pipeline & click on start. It usually takes 2-4 min for the provisioning stage of the pipeline.

The backbone of the pipeline is the build stage. This is where the user specifies the pipeline configuration details as the codebase to build, the infrastructure, the build workflow and all other additional components. The next step involves establishing the connection of the pipeline with the external resource. We use a connector in Harness CIE to develop this pipeline connection. The connector is a configurable object that automatically establishes connection to an external resource.

To create the Build Stage follow the steps given below:

  1. Move to the newly created pipeline in the Pipeline Studio, add a stage & select build.

  2. Add a stage name & under the configure codebase select connect connector.

  3. Click on New Creator & give preference to Github Connector from all the available options for connector type.

To configure the connector successfully provide the following details i.e a. URL Type as a Repository b. Connection Type as HTTP c. GitHub Repository URL

You’ll also have to verify the github username & PAT’s to make use of the connector. These secrets are stored in the Harness Secret Manager.

  1. Once the connector has been configured with the necessary credentials select Enable API Access.

  2. The connectivity medium can be directly through Harness Platform or through an delegate service running in an external resource.

  3. In this guide we’ll install the delegate into the K8s cluster. Select Connect Through An Harness Delegate from the available options.

  4. Install the new delegate with infrastructure type as Kubernetes.

  5. Configure the delegate information as Name, Size, Permissions etc & install the delegate using the workspace definition YAML file that can be installed directly to the build infrastructure.

  6. Download the YAML script and run it on the previously created cluster from the terminal.

  7. Login to the K8s cluster from the same terminal and click on connect option.

  8. Install the Harness Delegate using the harness-delegate.yaml file using the following command.

$ kubectl apply -f harness-delegate.yaml
  1. Set up the Delegate with the necessary configuration from the Delegate Setup option.

  2. Once the delegate is setup successfully you’ll see the connector & repo details in the About your stage component.

  3. Select on setup stage and the new stage will be added to the pipeline.

The next step is to set up & define the Build Farm Infrastructure under the pipeline configuration settings. To setup the BFI follow the steps below:

  1. Select the newly created K8s cluster & create a new connector. Specify details as Name, Details, Delegates Setup & Connection Test.
  2. Once verified click on Finish to add the new connector to the K8s Cluster Field.
  3. Verify the namespace carefully and move to the Execution component of the pipeline.

Now we can build & run tests over & against the hosted code. Move to the Execution Tab of the pipeline & add the step to run the steps. Follow the following steps to setup the Execution workflow of the pipeline:

  1. Add a run step to the pipeline & configure it as follows:

    • Give the step an appropriate name
    • Click on add a new connector option under the container registry option.
    • Select the connector type as Docker Registry
  2. We’ll now create a new connector to the DockerHub account. Specify the account credentials and configure the secrets.

docker-img

  1. Verify the connection test & once successful click on Finish. Now we can Configure Run Step pane, with the new Connector in the Container Registry setting. Configure the step as follows:
  • Give an appropriate step name.
  • The Container Registry should show the Docker Hub Connector you just created.
  • Image: golang:1.15
  • Command:
go get gotest.tools/gotestsum
gotestsum --format=standard-verbose --junitfile unit-tests.xml || true
CGO_ENABLED=0 GOOS=linux GOARCH=amd64 go build -a -tags netgo

The last line contains the go build command to compile the package, along with its dependencies. Once configured click on Apply changes & save the pipeline.

Now we can add the step to build & push the created image into the DockerHub repository. A repository in DockerHub is required to receive the artifacts from the pipeline. Add a step and specify the DockerHub account credentials.

Configure the step as follows:

  • Select Name as the Step name you defined earlier.
  • Select the Docker Hub Connector you set up previously.
  • Paste the docker repository URL & specify the tags: <+pipeline.sequenceId>
  • After successfully configuring the step components select Apply Changes & save the pipeline.

The pipeline is now ready for execution & can be used for running tests. You can also add the Integration Tests to the pipeline. To execute the pipeline click on Run. Select Git Branch and the git branch name when prompted such as main and click on Run Pipeline

You can view the logs of each step by clicking on it or else can also switch to the console view for more tracking down the micro details. The entire pipeline is also available in YAML. You can directly make changes to the YAML file and save the changes and it will automatically be reflected in the pipeline when executed.

Conclusion - Developer Feedback on Harness CIE

Developers spend a lot of time into coding & solving the engineering problems. With Harness CIE we can now easily cut down the operational & functional time cost drastically. The added advantage to the features of CIE is the User Interface of CIE which is sleek and easy & solves major issues of longer build and testing time. Harness CIE automatically scales up the build, test and deploy cycles.

The product focuses on developers & is completely developer-centric built around what a developer seeks to be the one stop solution for CI/CD.